• Skip to main content
  • Skip to primary sidebar
The Latin Pantry
menu icon
go to homepage
  • Contact us
  • About
  • Recipes
    • Appetizers
    • Soups
    • Entrees
    • Desserts
    • Drinks
    • Instagram
    • Pinterest
  • search icon
    Homepage link
    • Contact us
    • About
    • Recipes
      • Appetizers
      • Soups
      • Entrees
      • Desserts
      • Drinks
    • Instagram
    • Pinterest
  • ×
    Home

    All my recipes

    Baked Panela Cheese with Sun-Dried Tomatoes

    Jul 17, 2025 · Leave a Comment

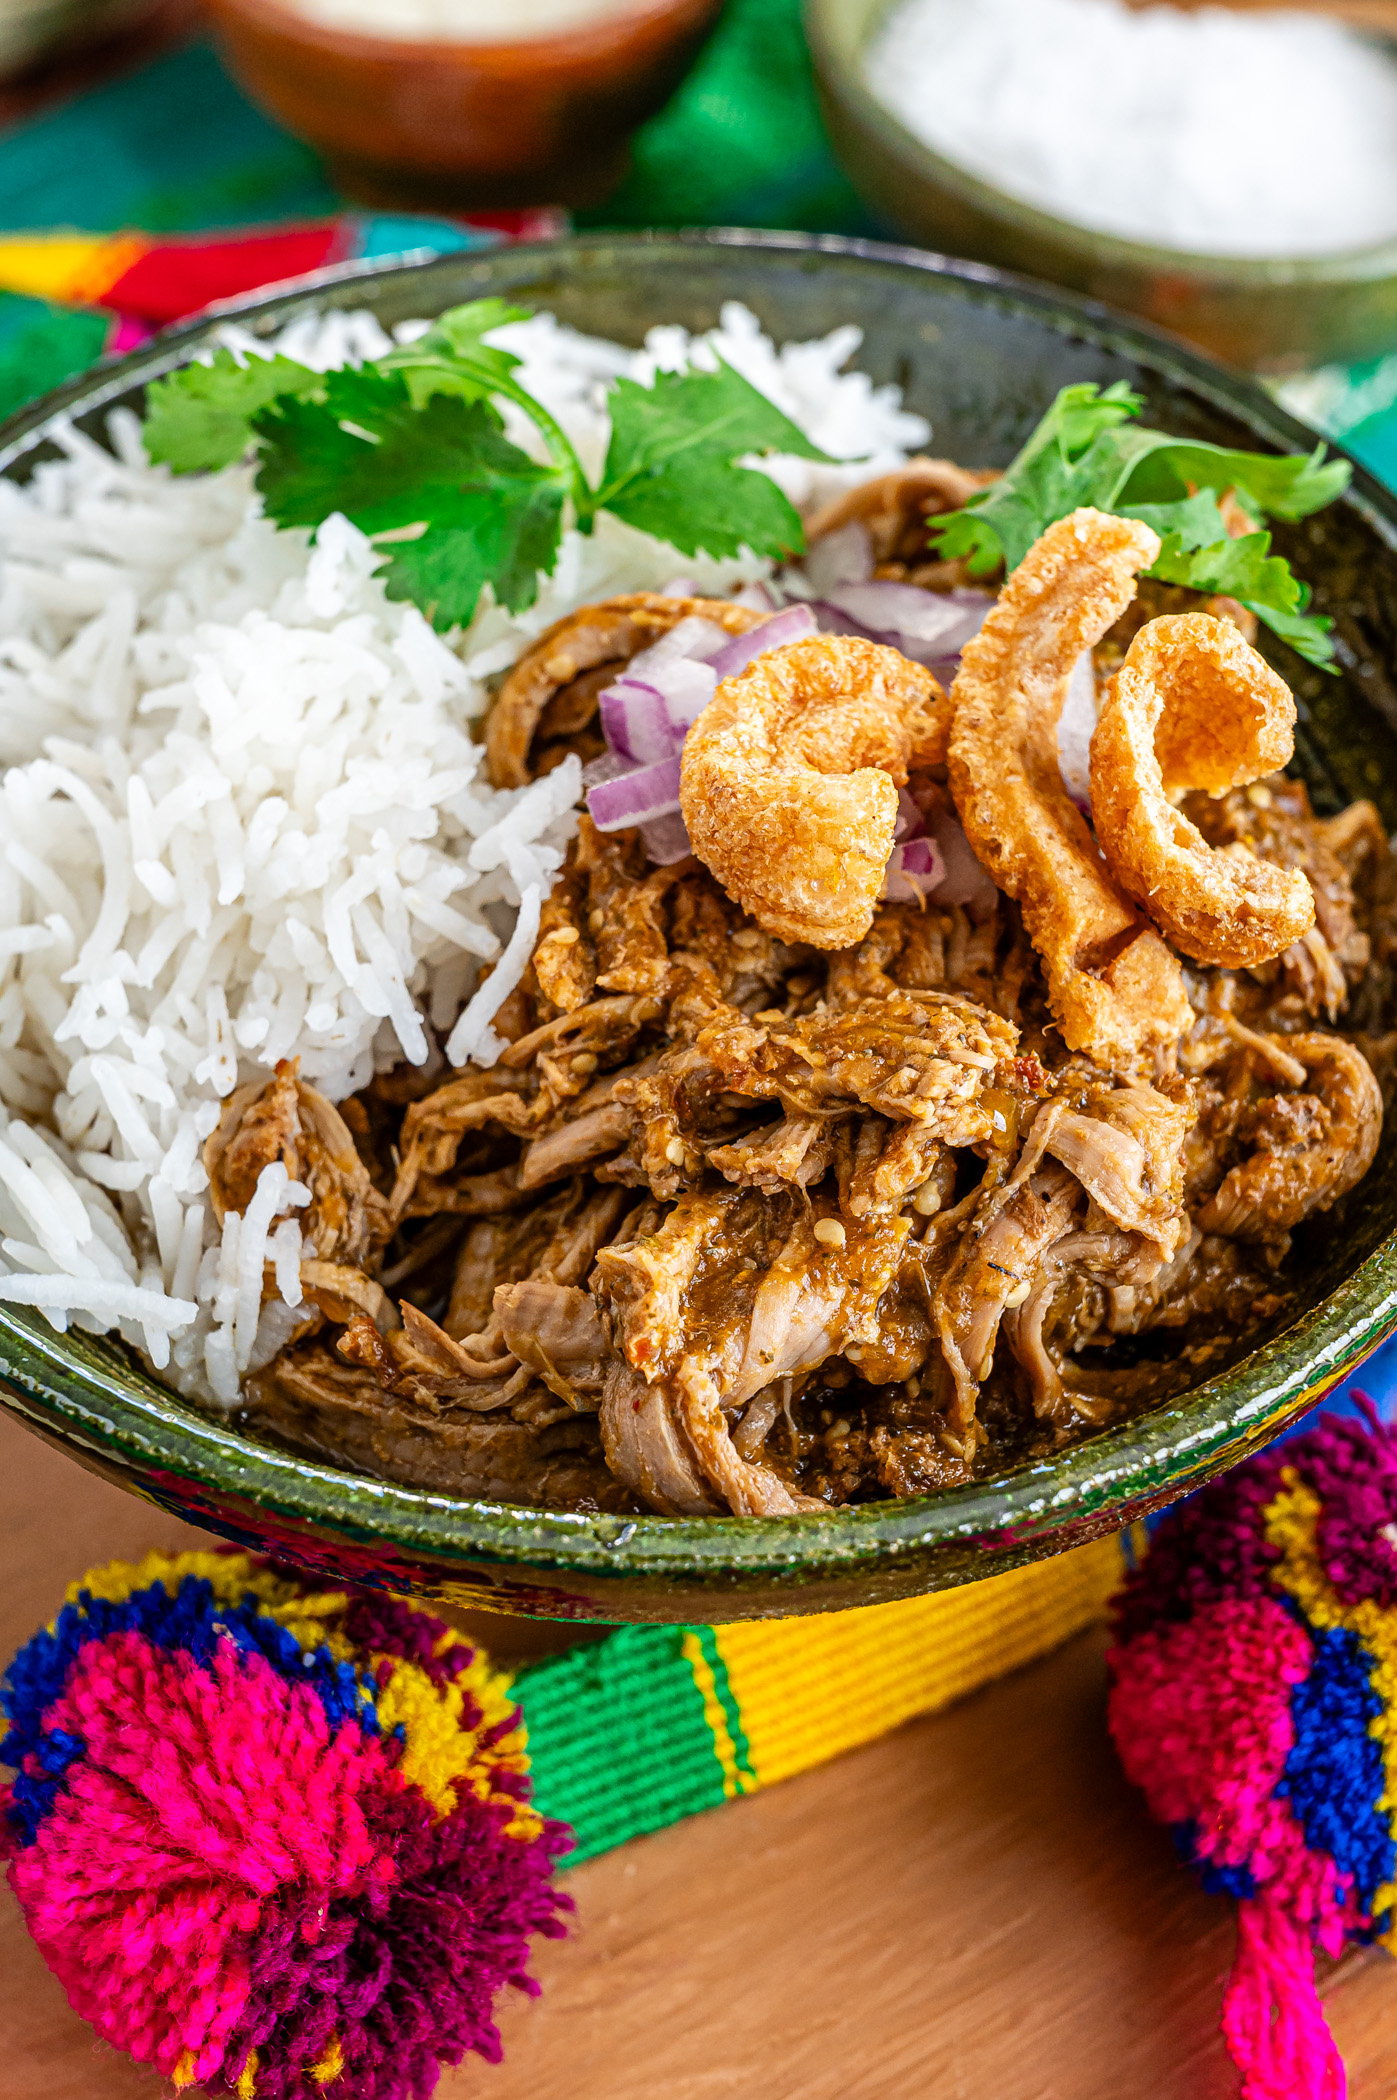
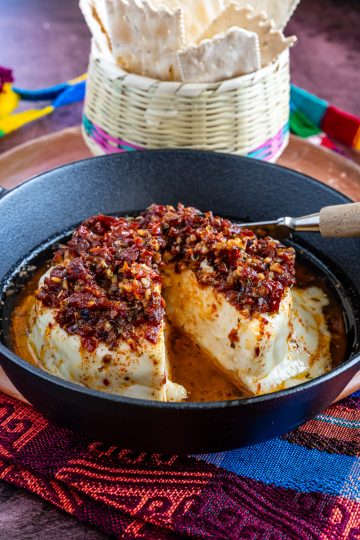
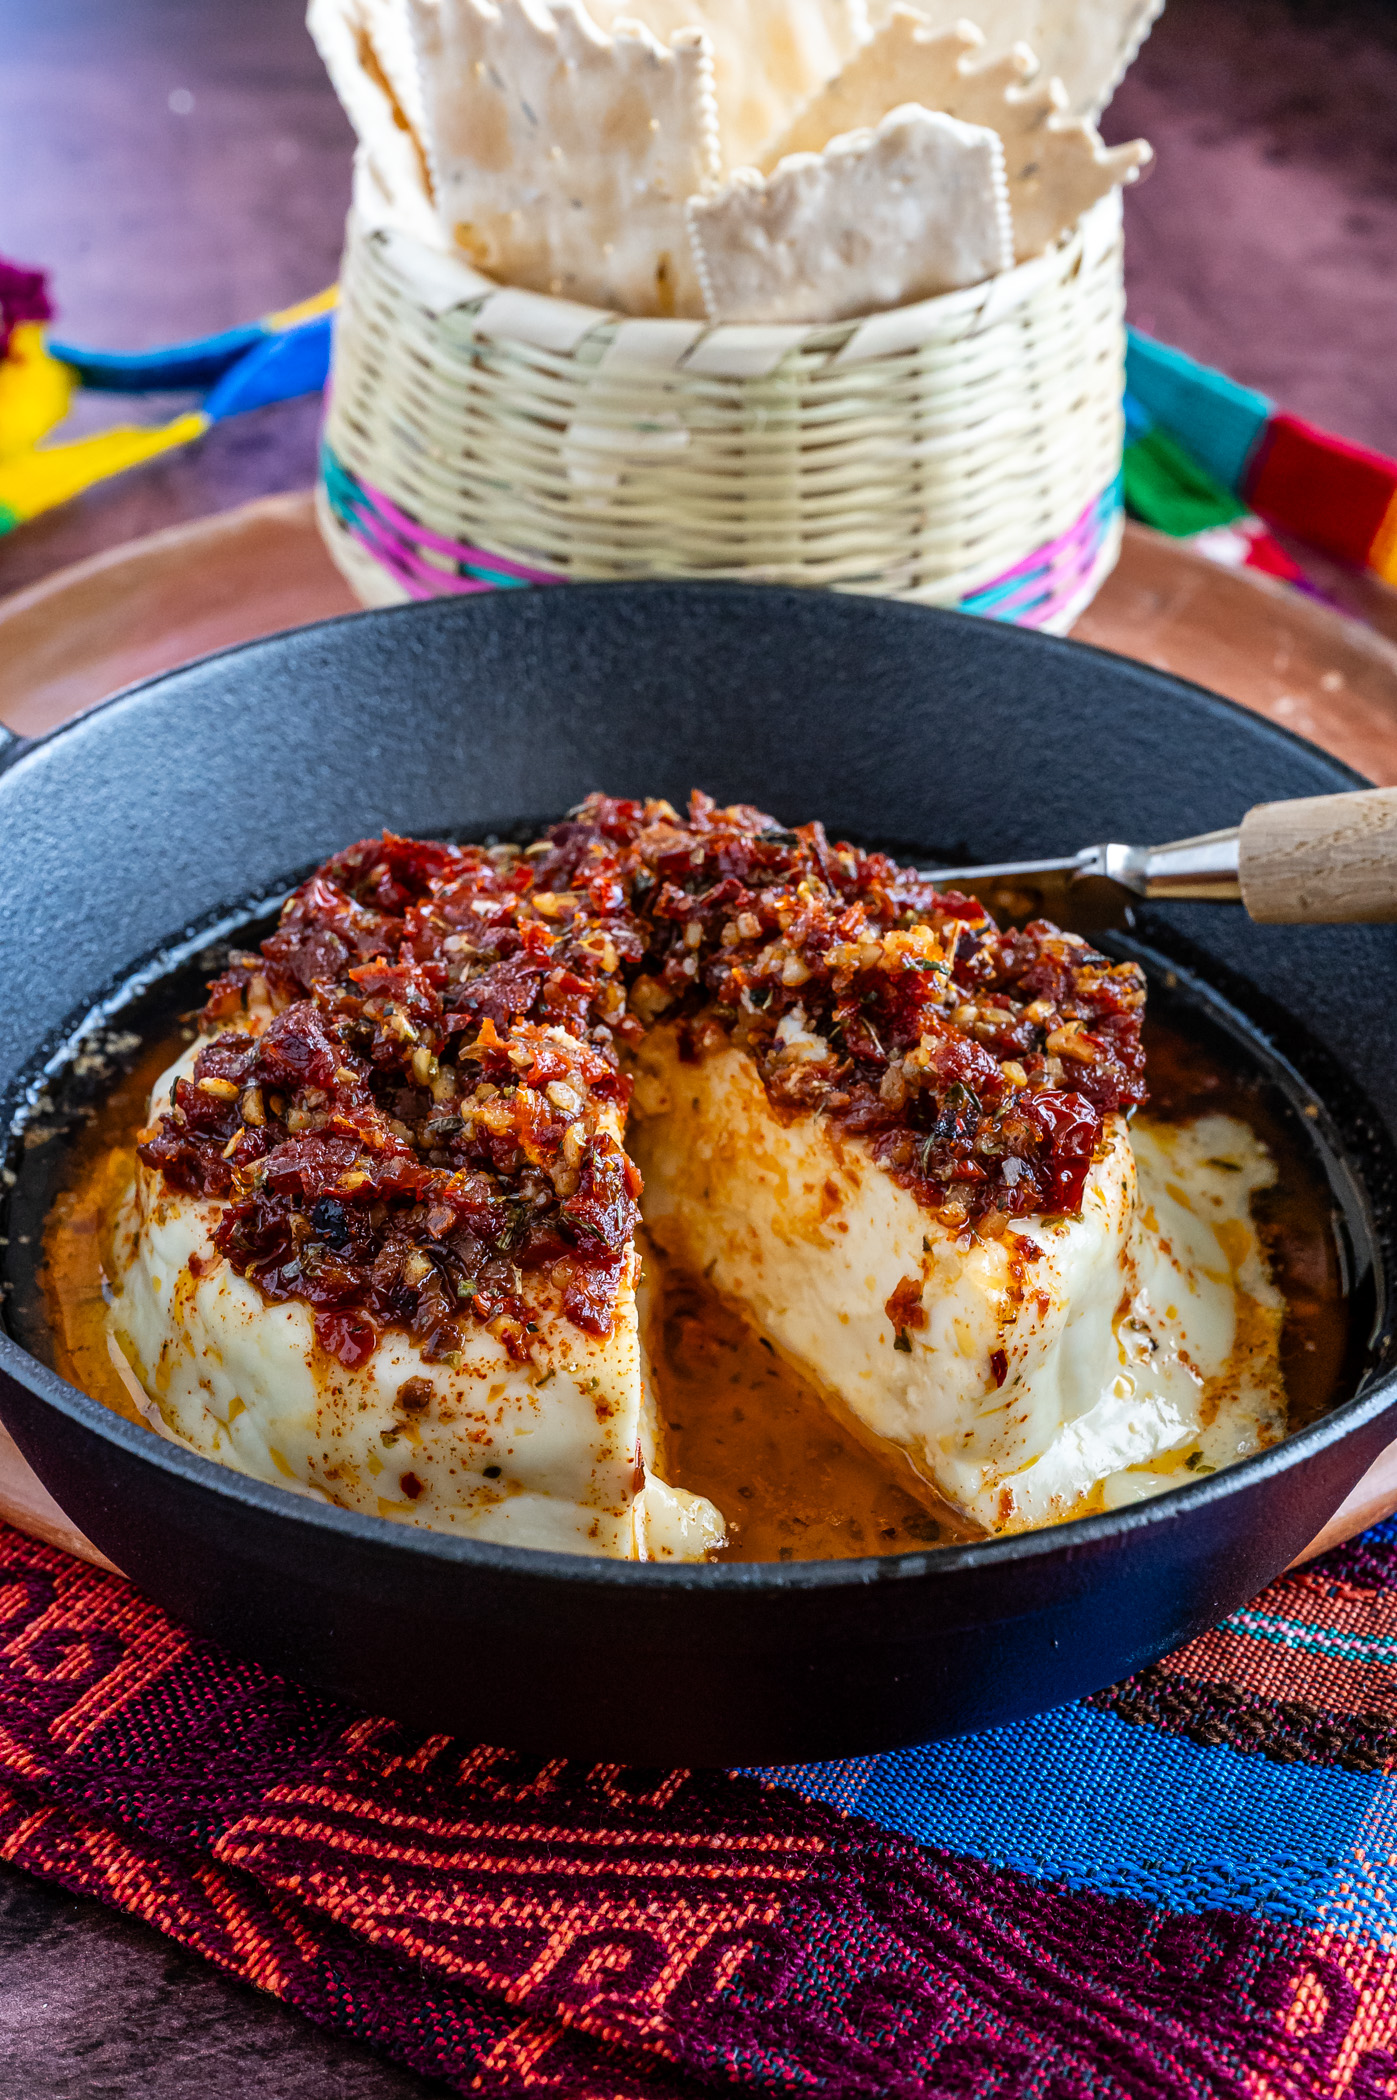
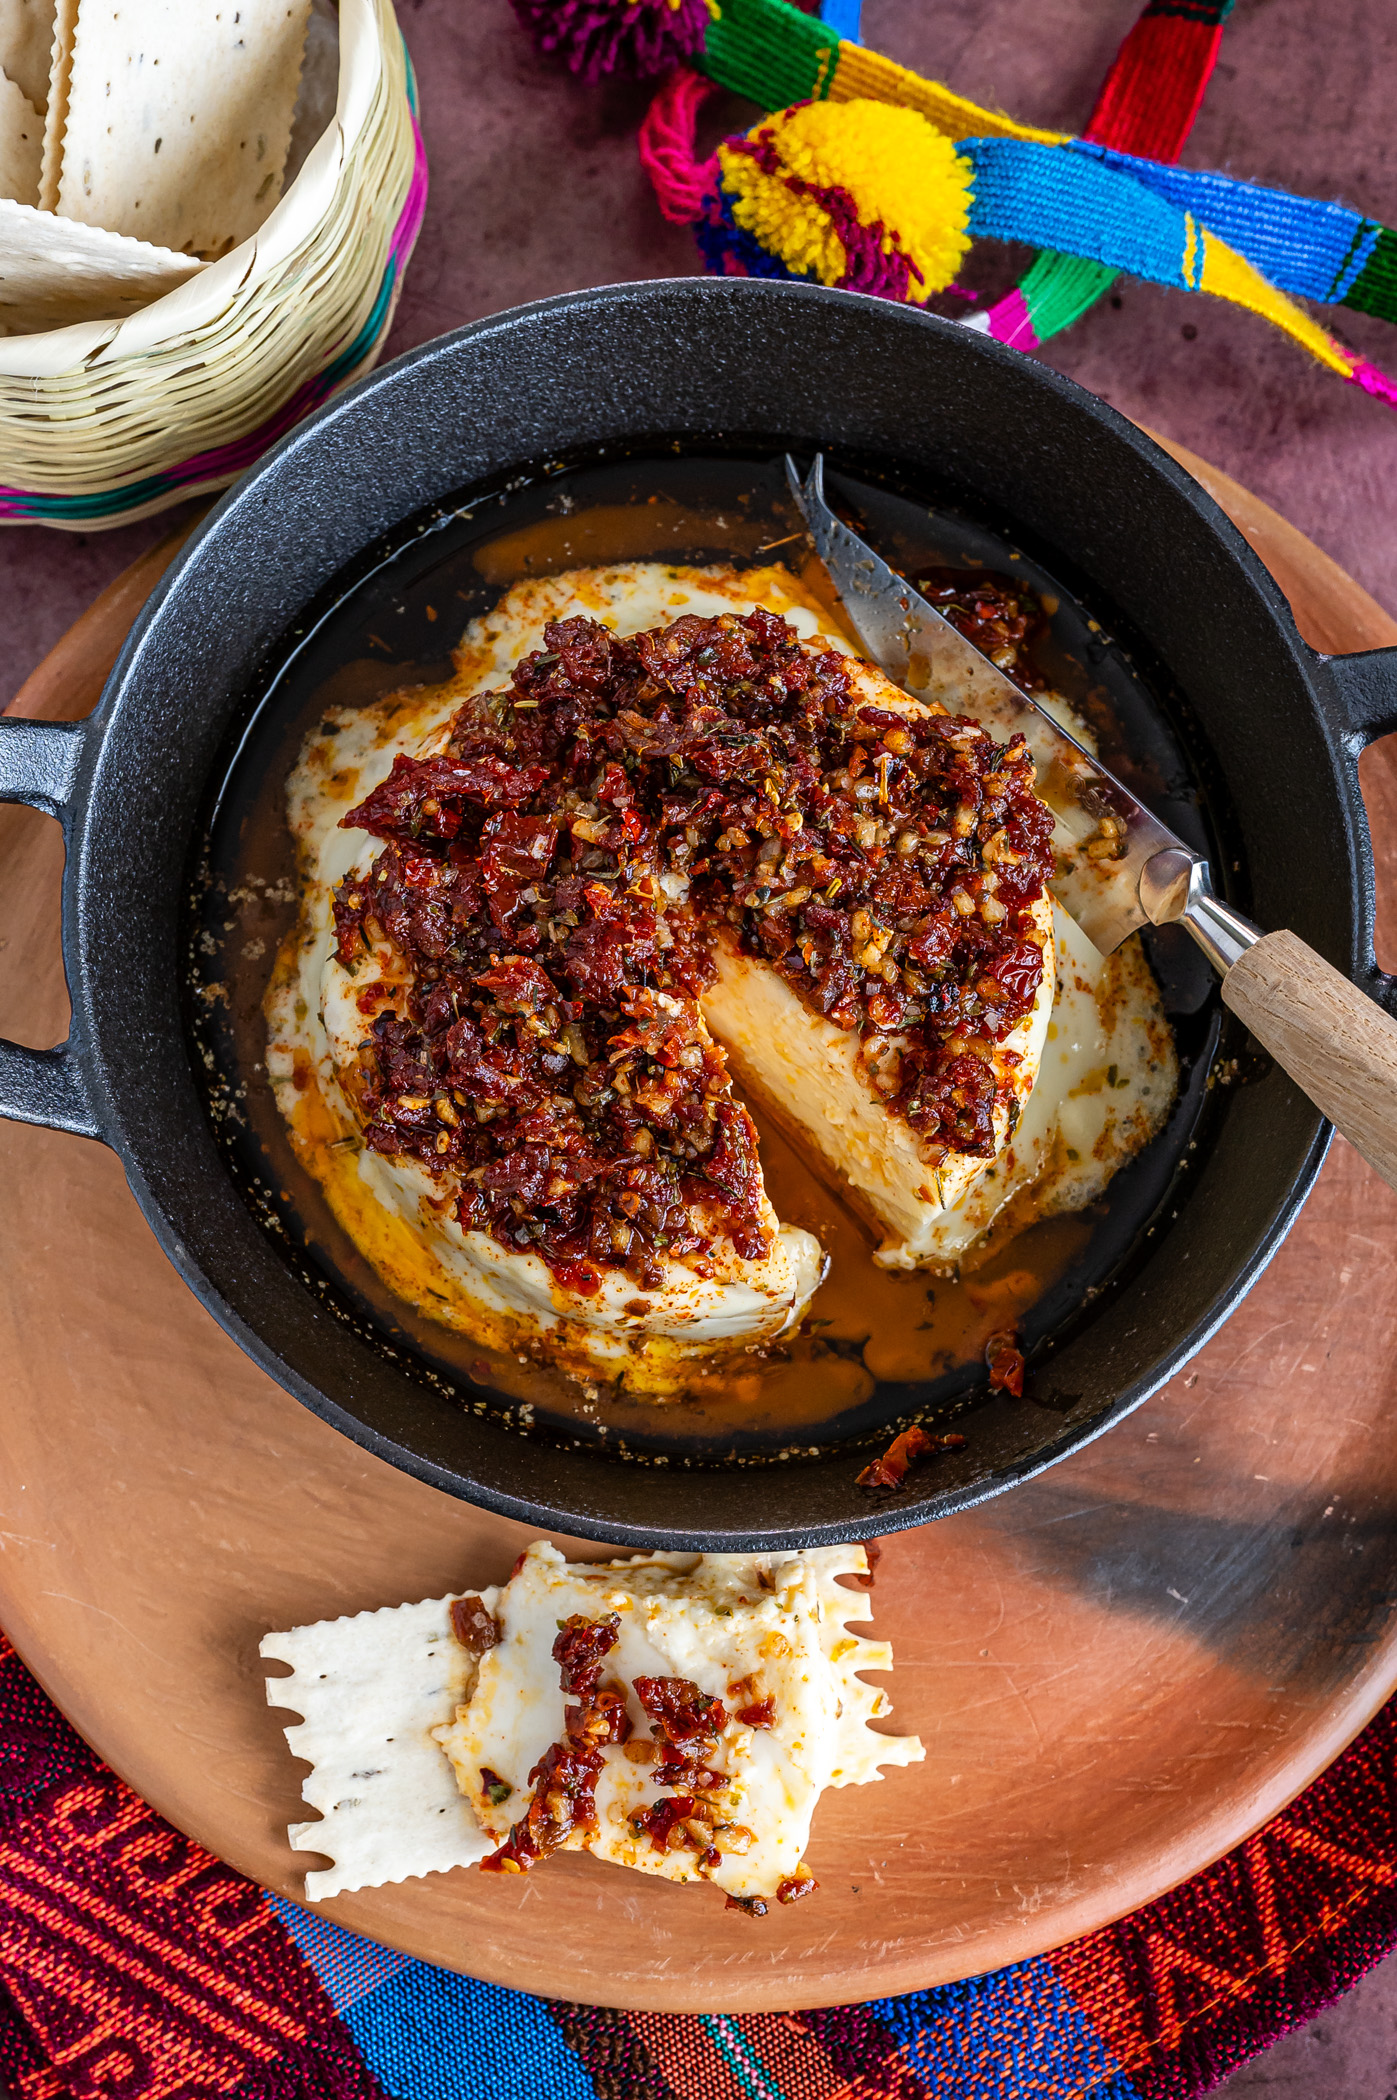
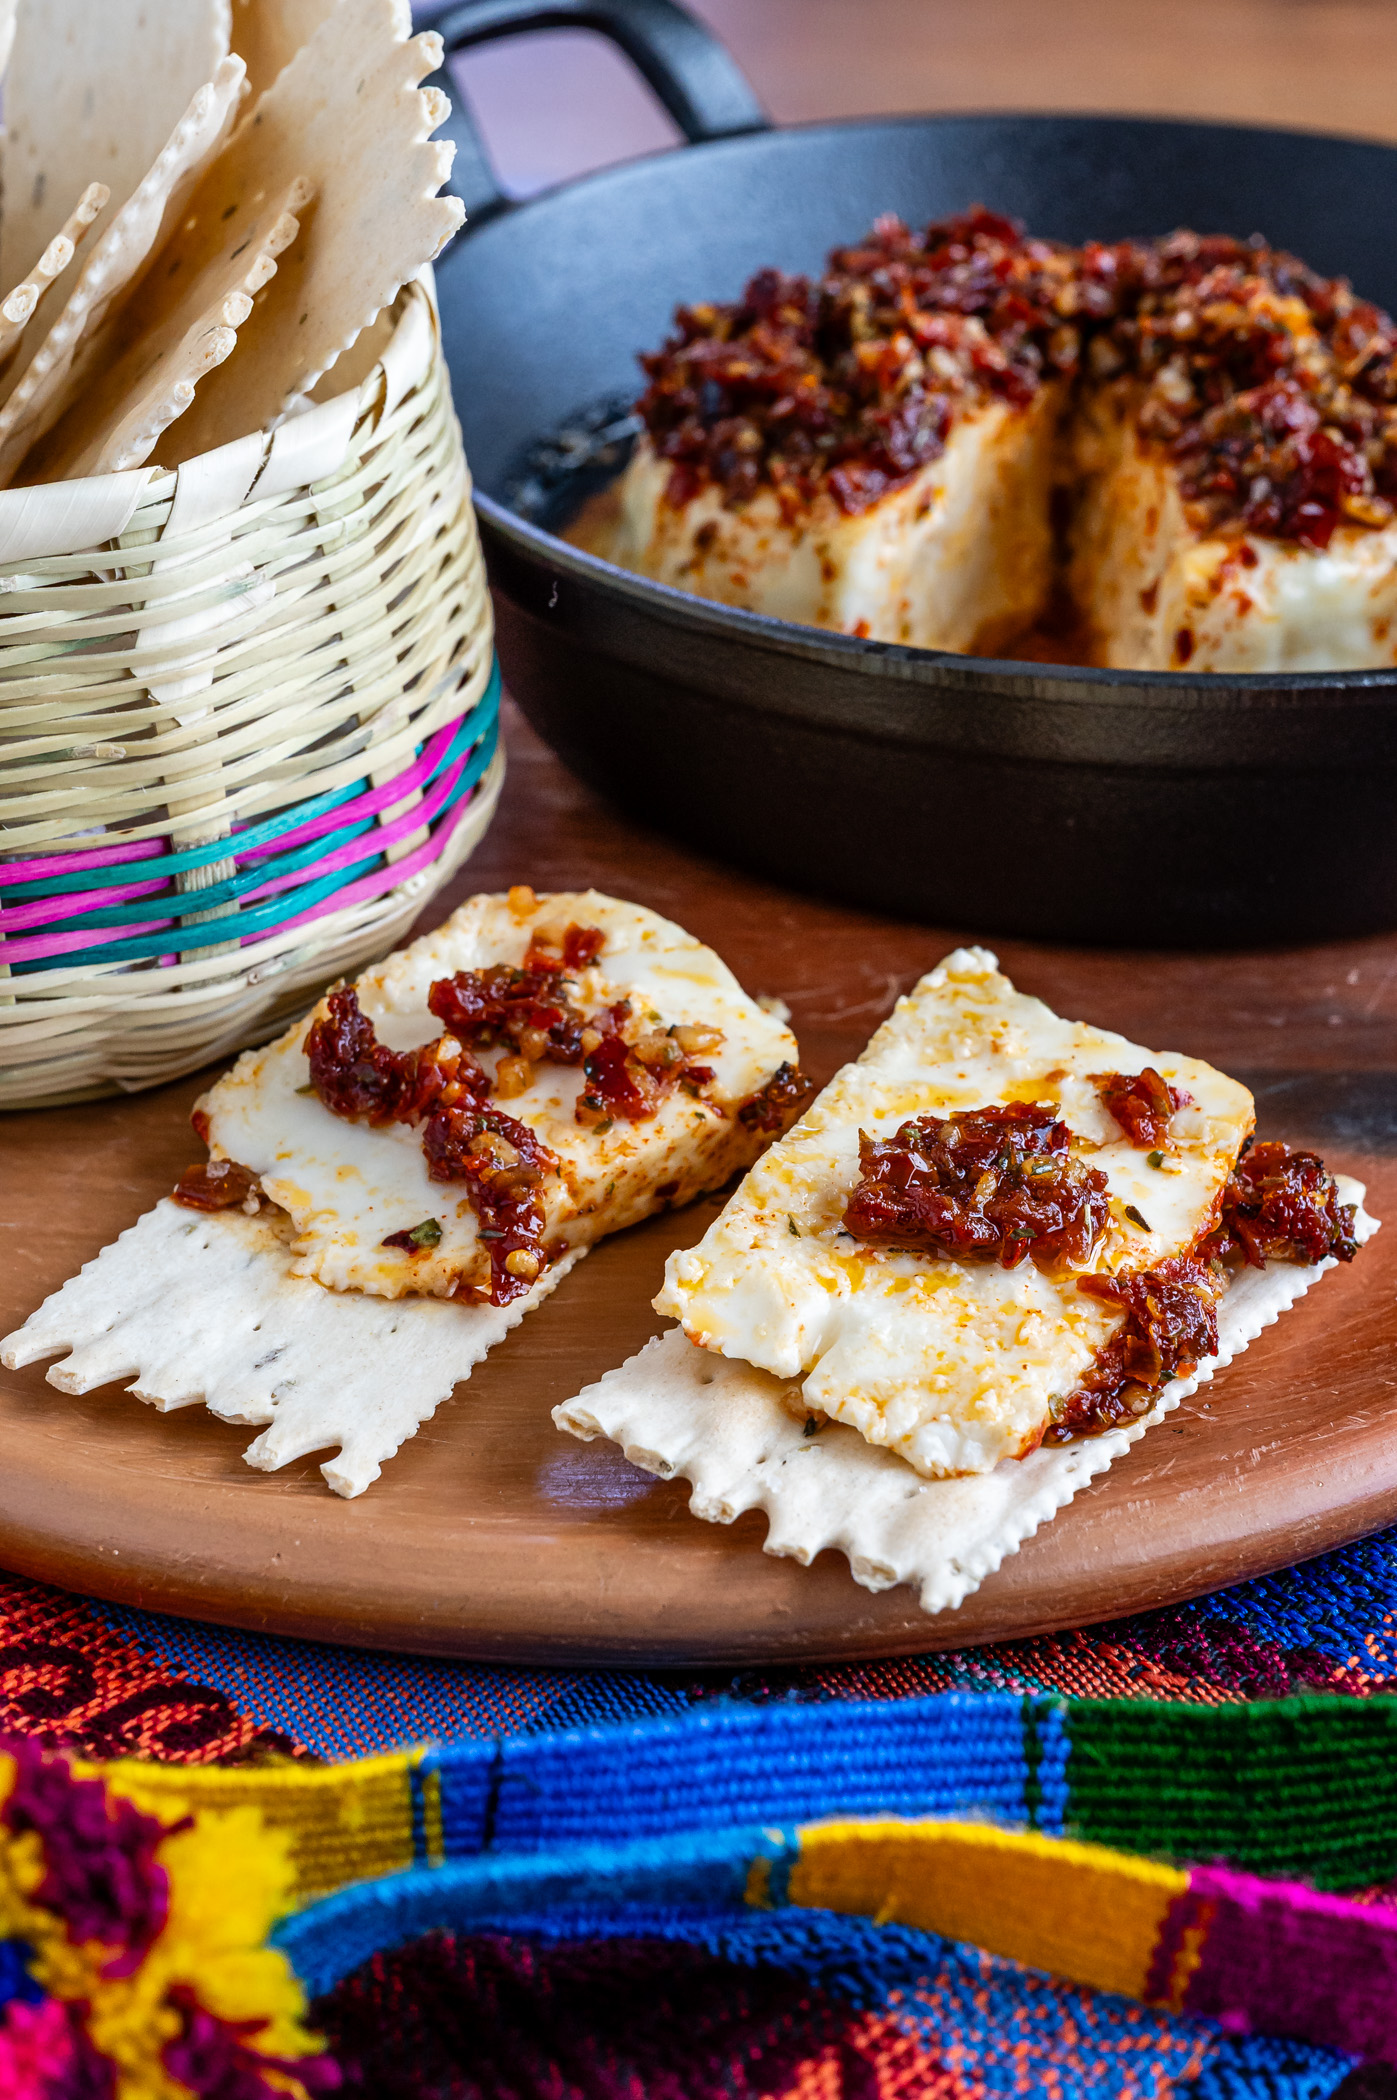
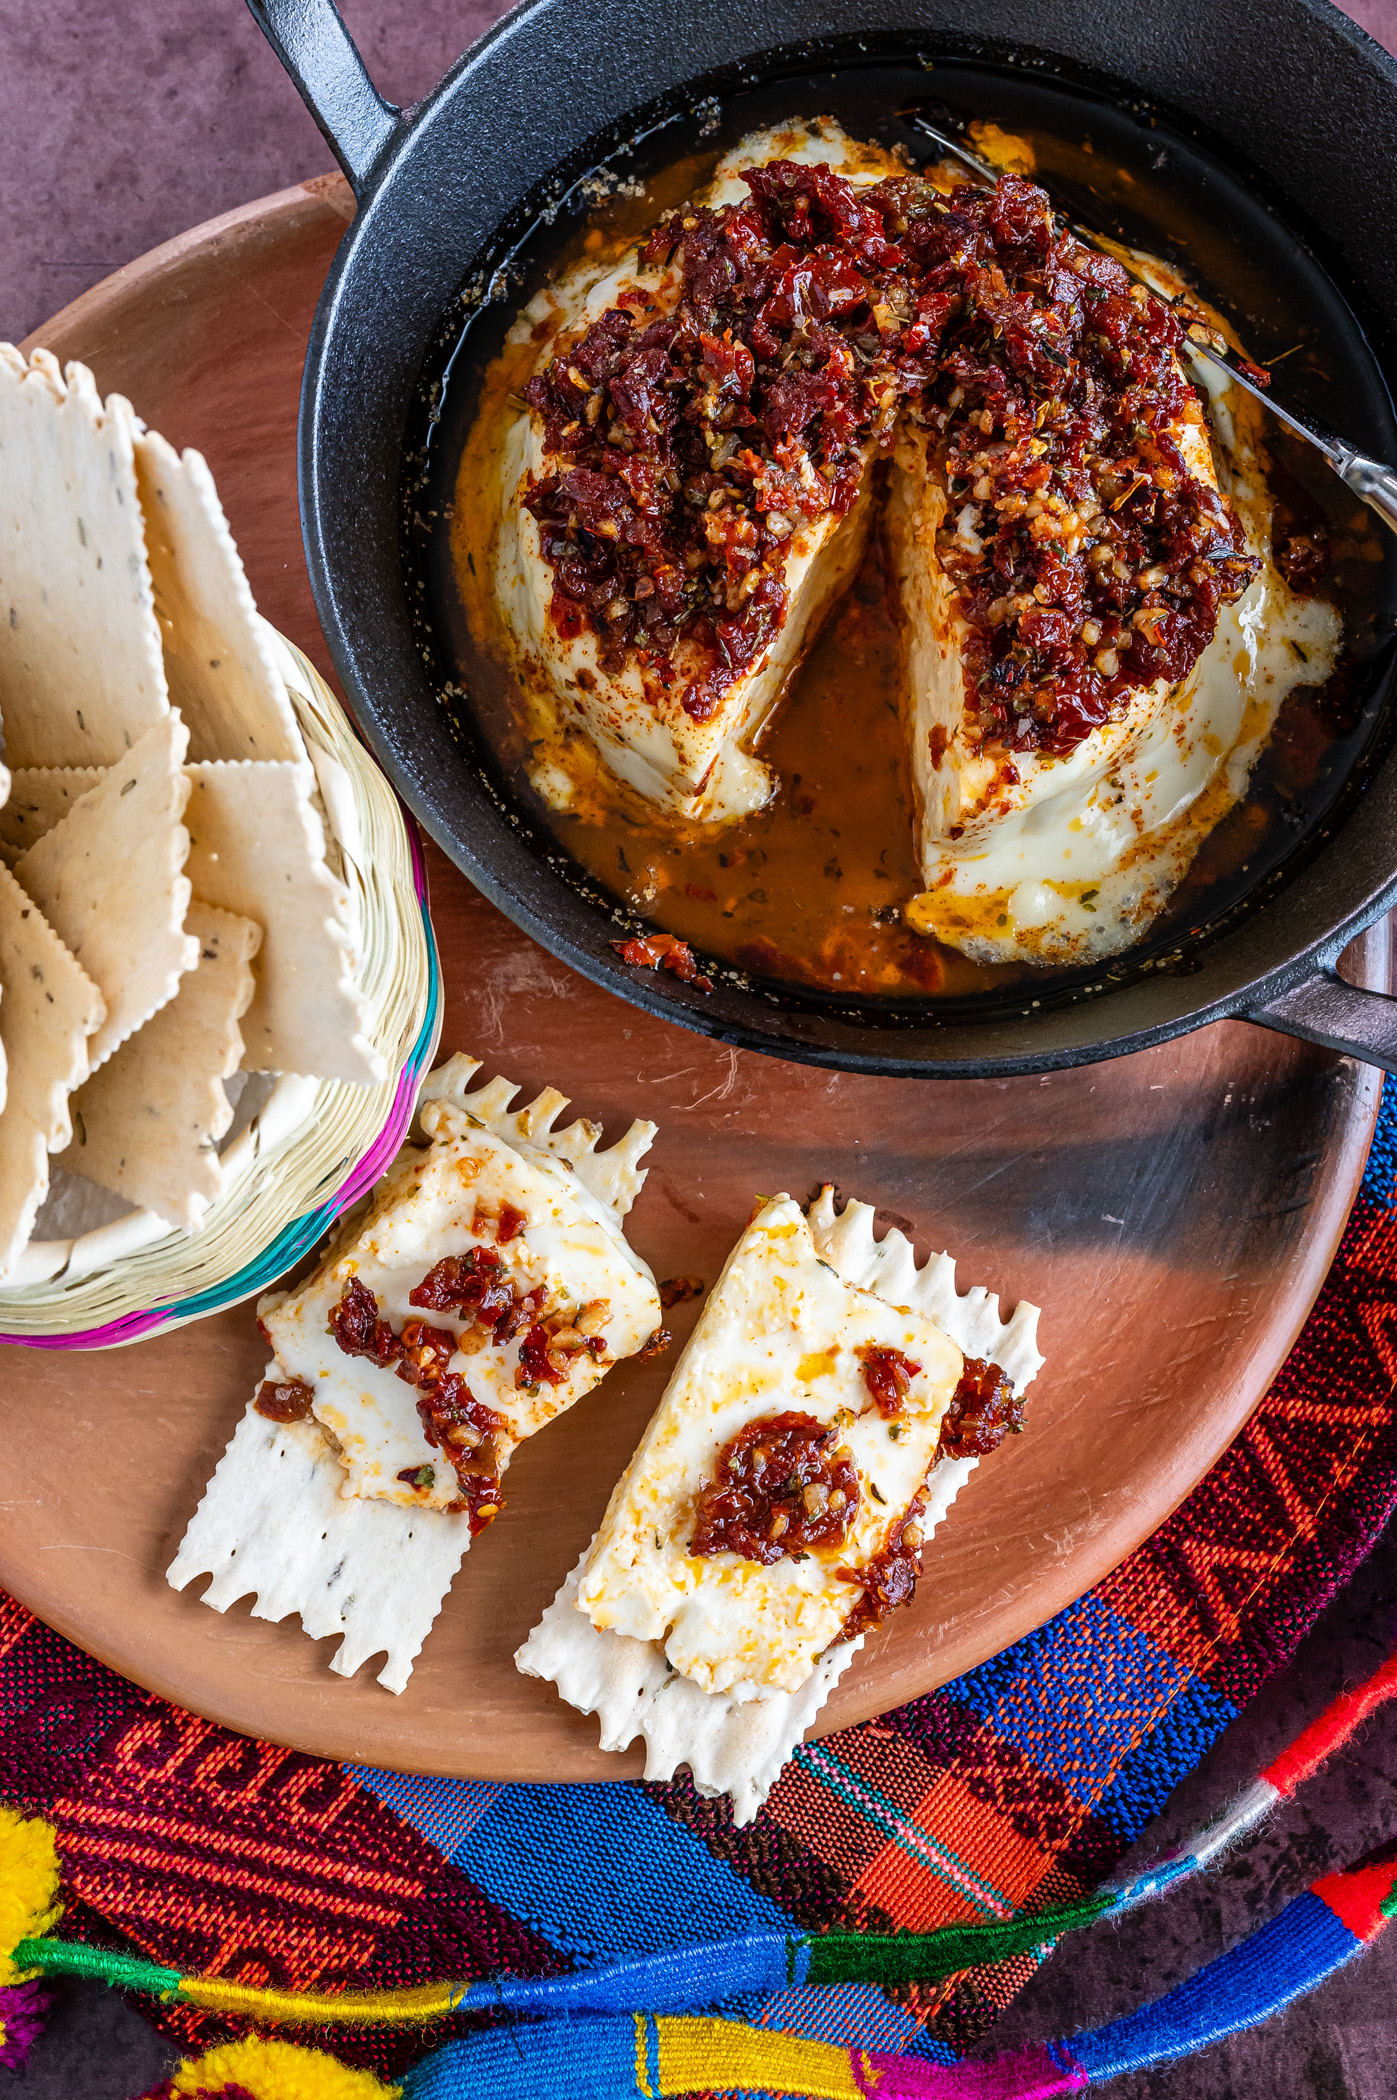
    If you're a cheese lover, this hot Baked Panela Cheese with Sun-Dried Tomatoes is the best appetizer for you. All your guests will love it and it'll disappear before your eyes like magic. A mixture of olive oil, herbs, garlic, spices, and chopped sun-dried tomatoes are baked over soft Panela cheese for a creamy, herby bite you can serve with toasted baguette slices or over crackers.

    Ingredients for Baked Panela Cheese with Sun-Dried Tomatoes

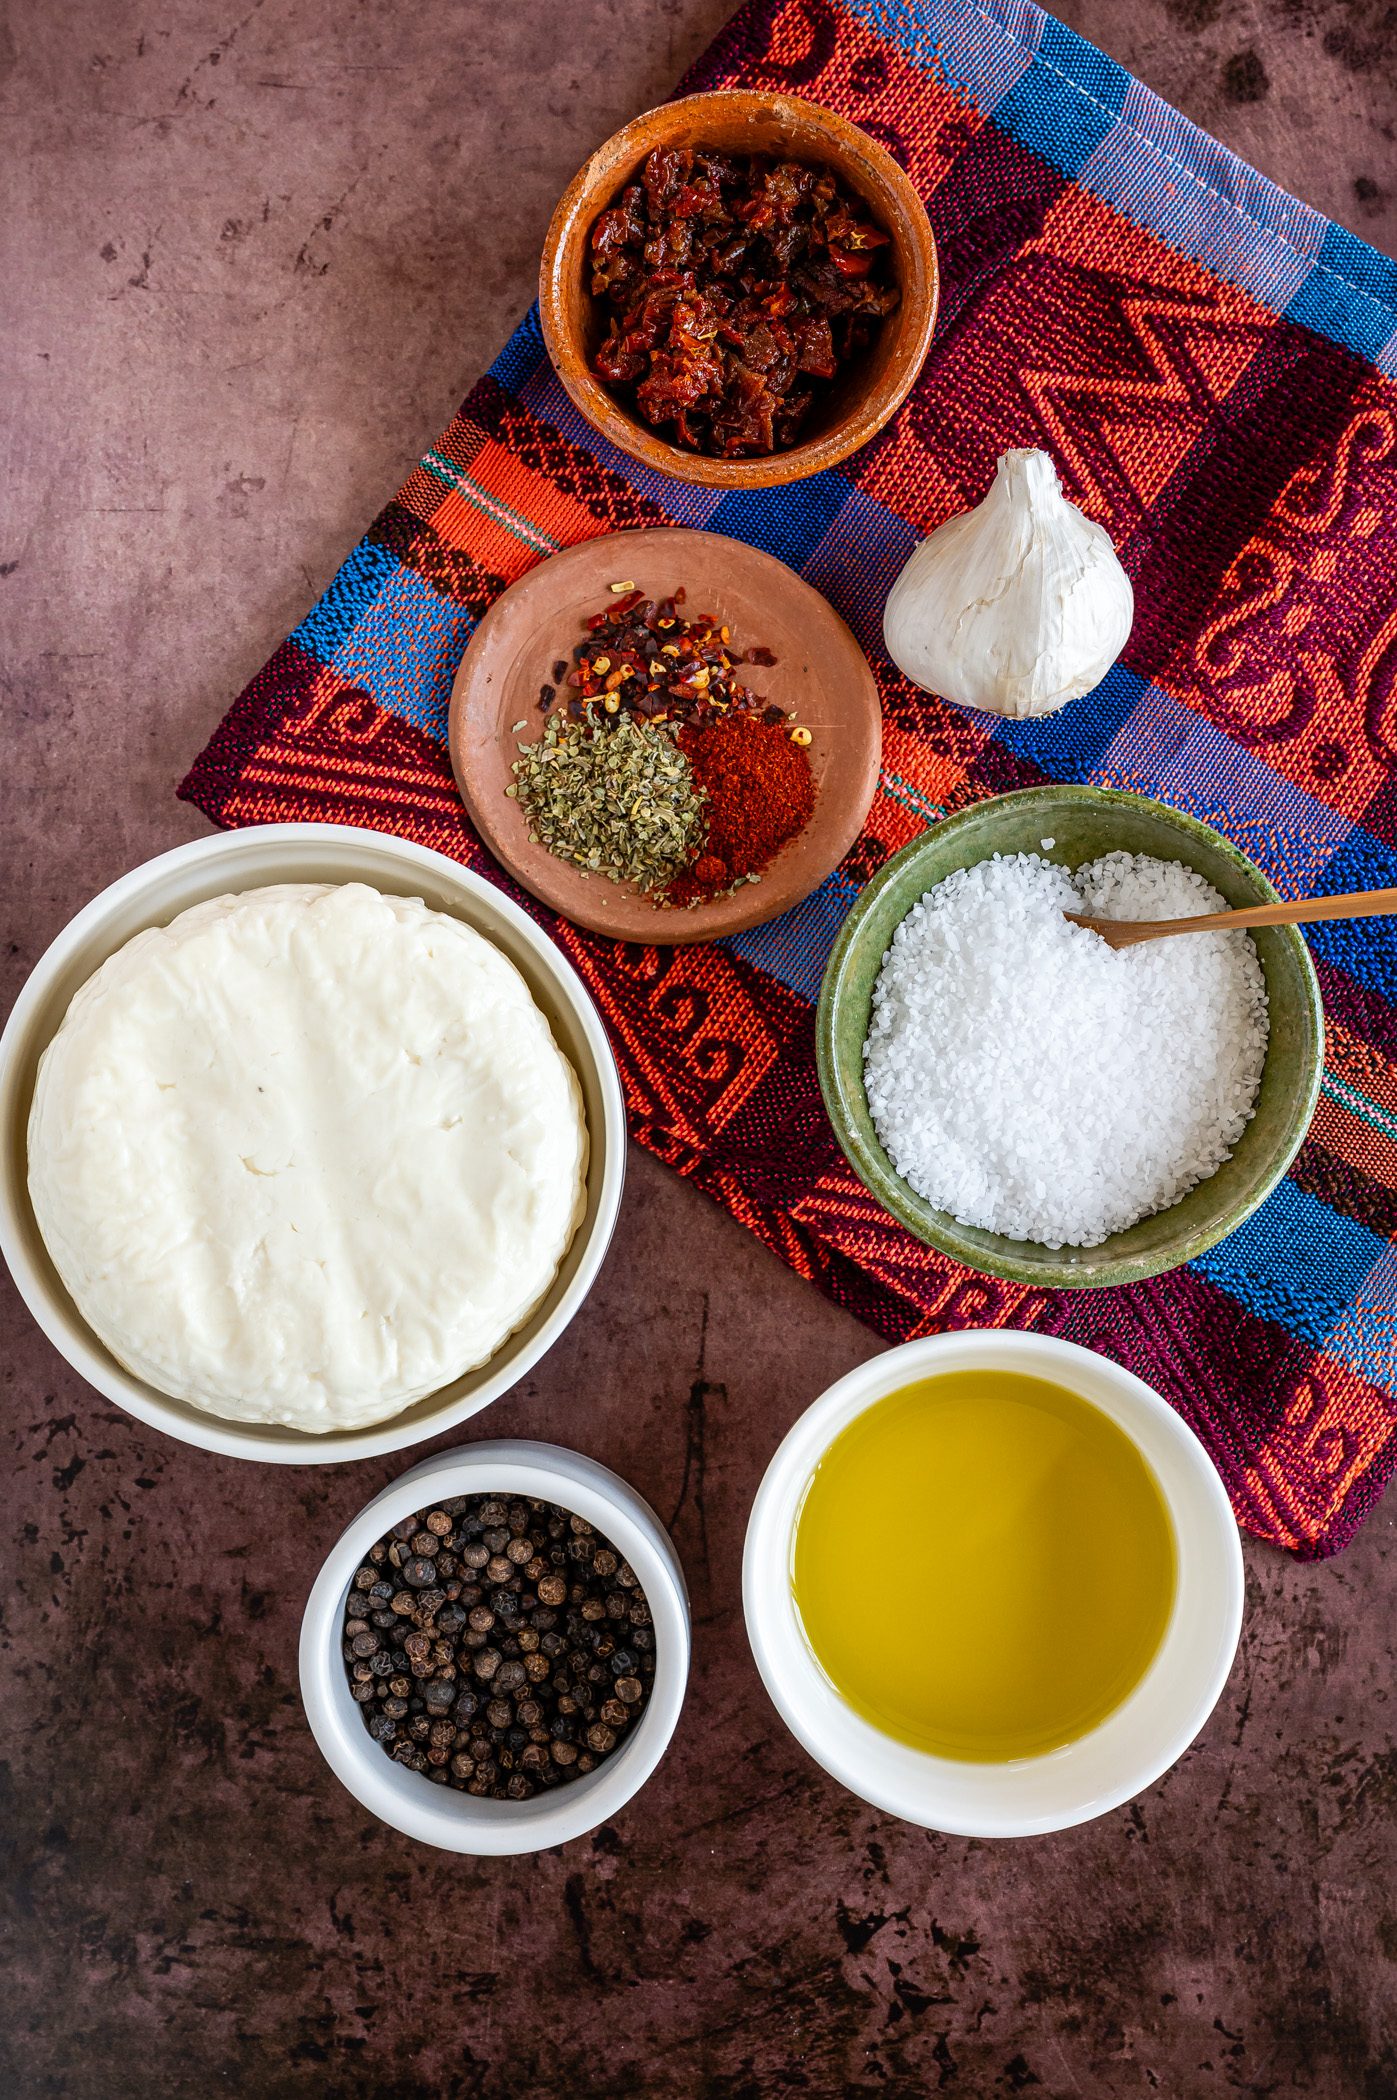
    • Panela cheese or any Farmer cheese-type soft cheese
    • Olive oil
    • Garlic
    • Sun-dried tomatoes (packed in oil or dry)
    • Italian seasoning: you can also just use oregano, basil, marjoram, or any herb you have on hand.
    • Paprika
    • Red pepper flakes
    • Salt and pepper

    How to Make Baked Panela Cheese with Sun-Dried Tomatoes

    1. Preheat the oven to 350 F.

    2. Mix the olive oil, garlic, sun-dried tomatoes, Italian seasoning, paprika, red pepper flakes, salt, and pepper in a small bowl until well combined.

      3. Place the Panela cheese in a small baking dish (I used a mini cast iron skillet), and spoon the sun-dried tomato mixture over it.

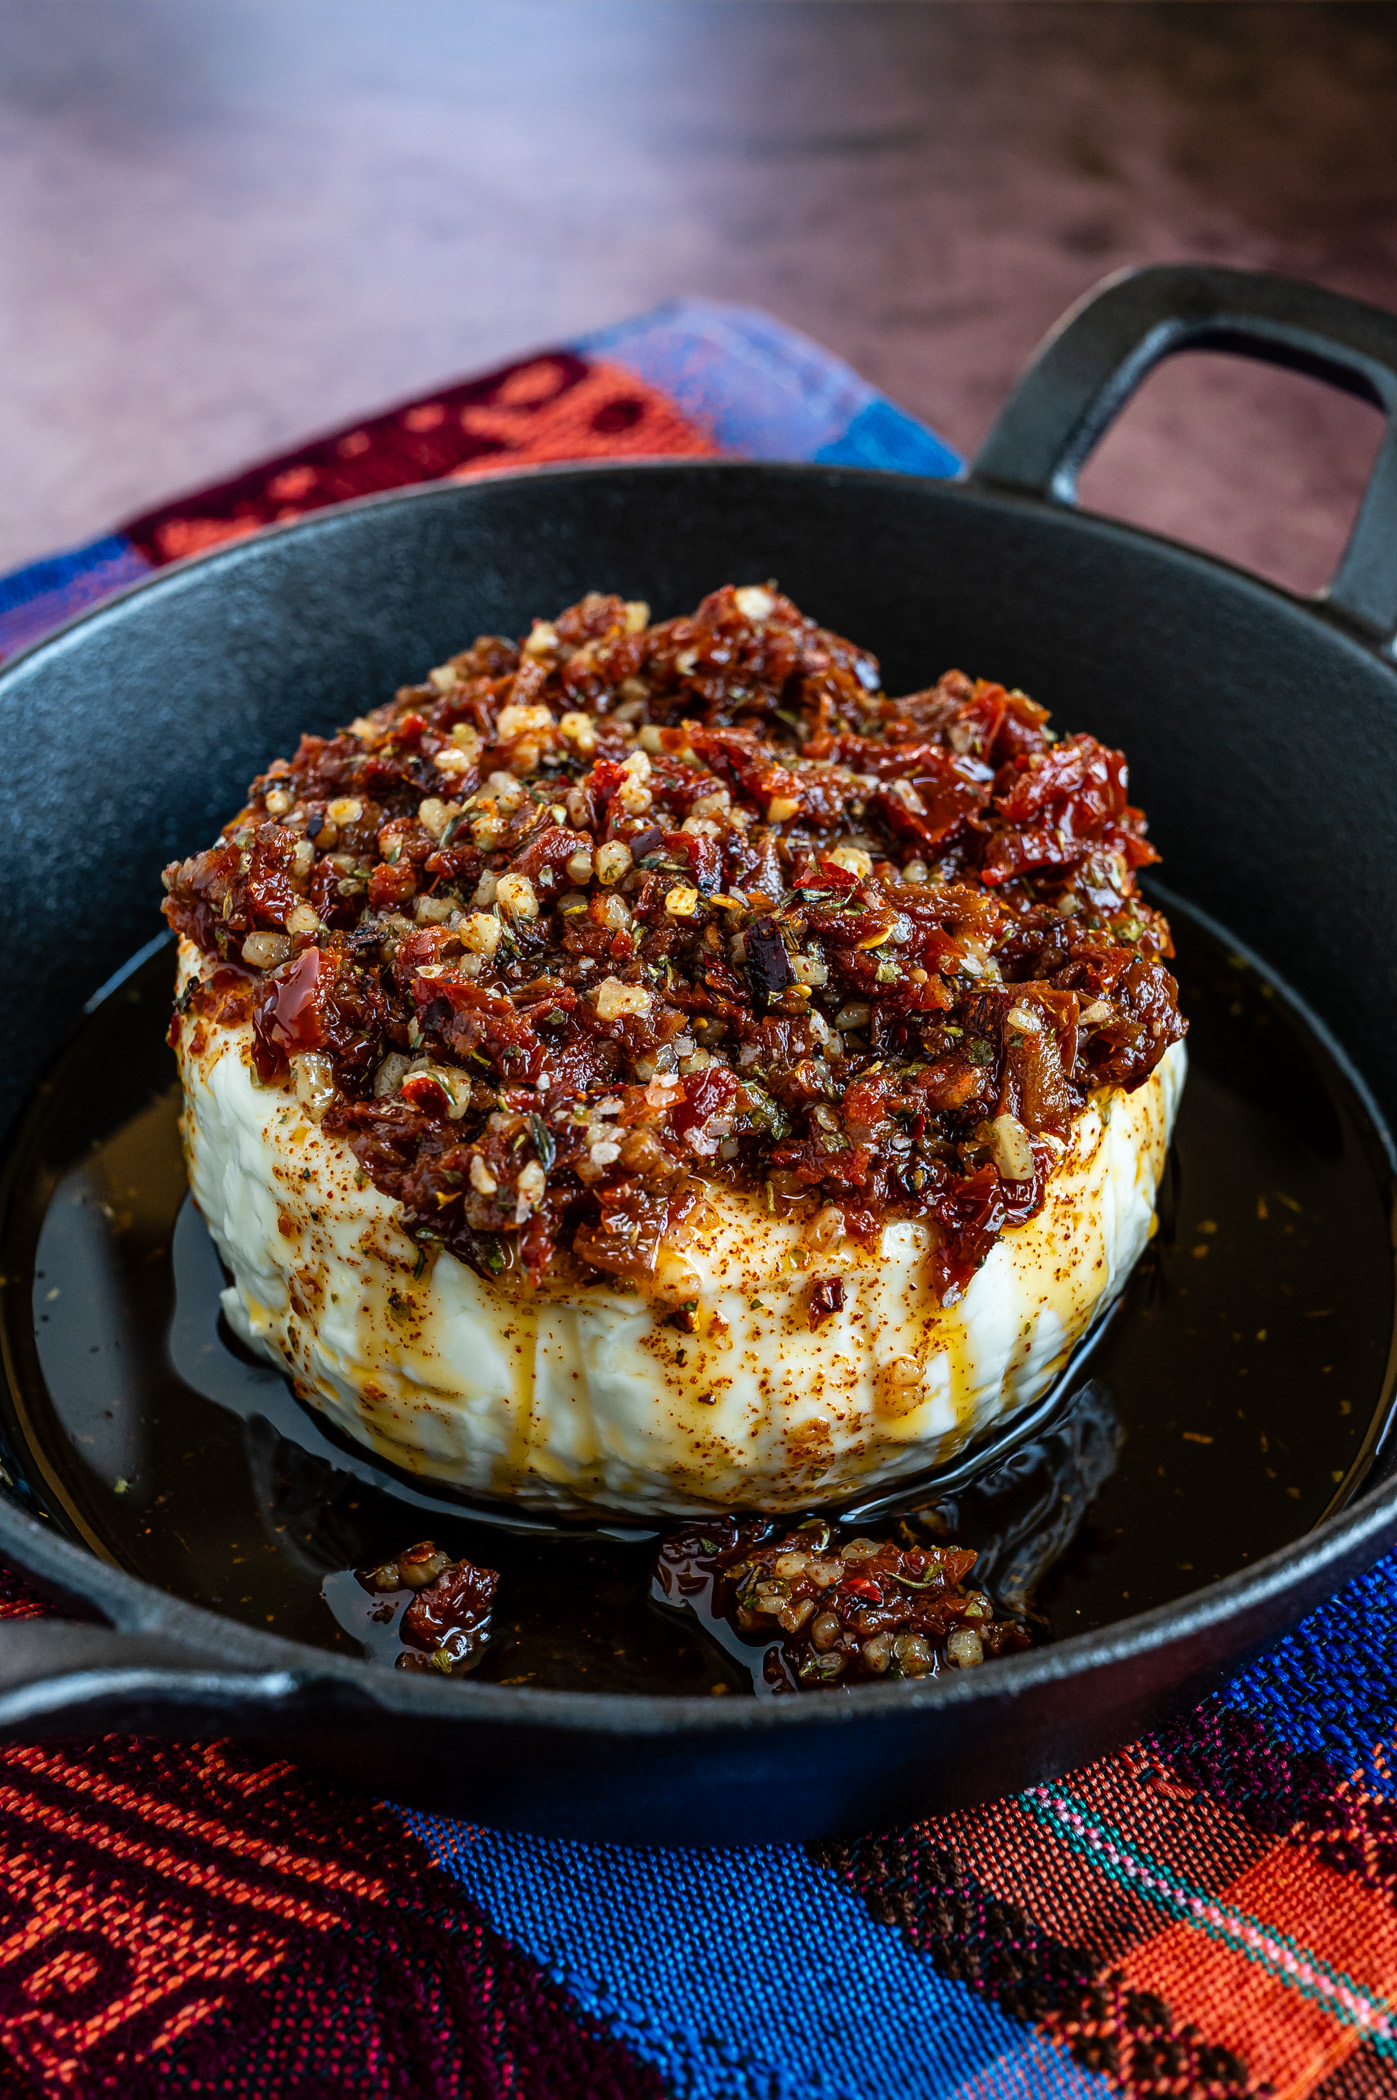
      4. Bake, uncovered, for 15-20 minutes or until the cheese is starting to melt but still holds its shape. Serve while hot with toasted baguette rounds or crackers.

      If you don't have sun-dried tomatoes use only olive oil, herbs, spices, garlic, and red pepper flakes. It'll be just as delicious!

      Tips to Make the Best Baked Panela Cheese

      1. Mince the garlic and chop the sun-dried tomatoes finely so everyone can get a little bit of both in every bite.
      2. Keep an eye on the cheese so it doesn't bake until it's fully melted. It should be slightly melted but still hold its shape.
      3. If you don't like spicy food, omit the red pepper flakes.
      4. Use the herbs and spices you have on hand if you don't have Italian seasoning.

      Baked Panela Cheese Variations:

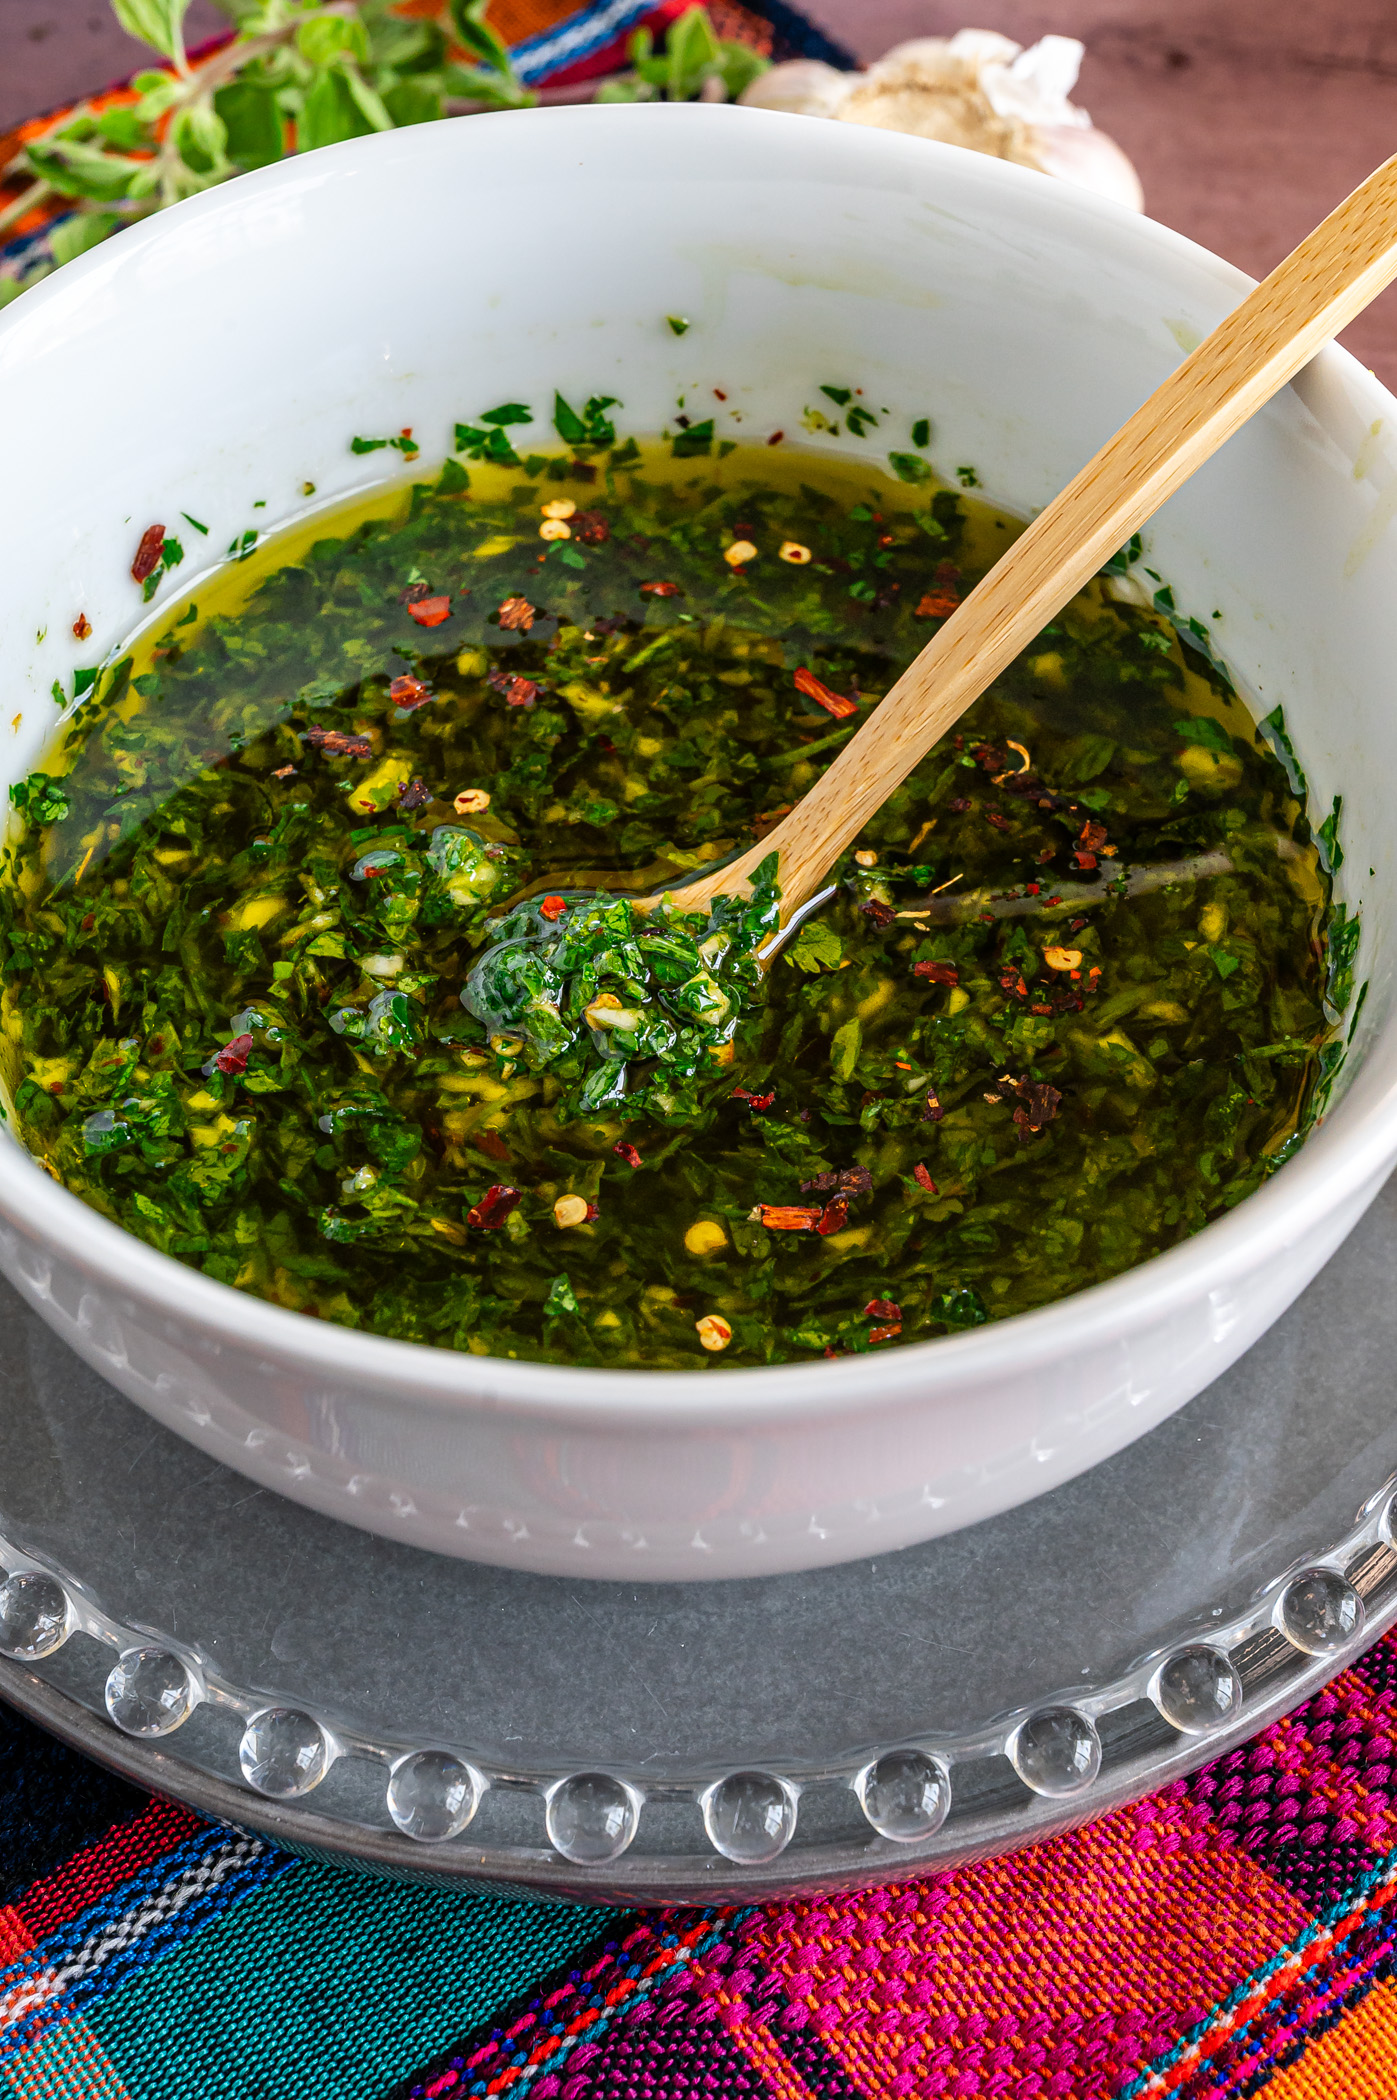
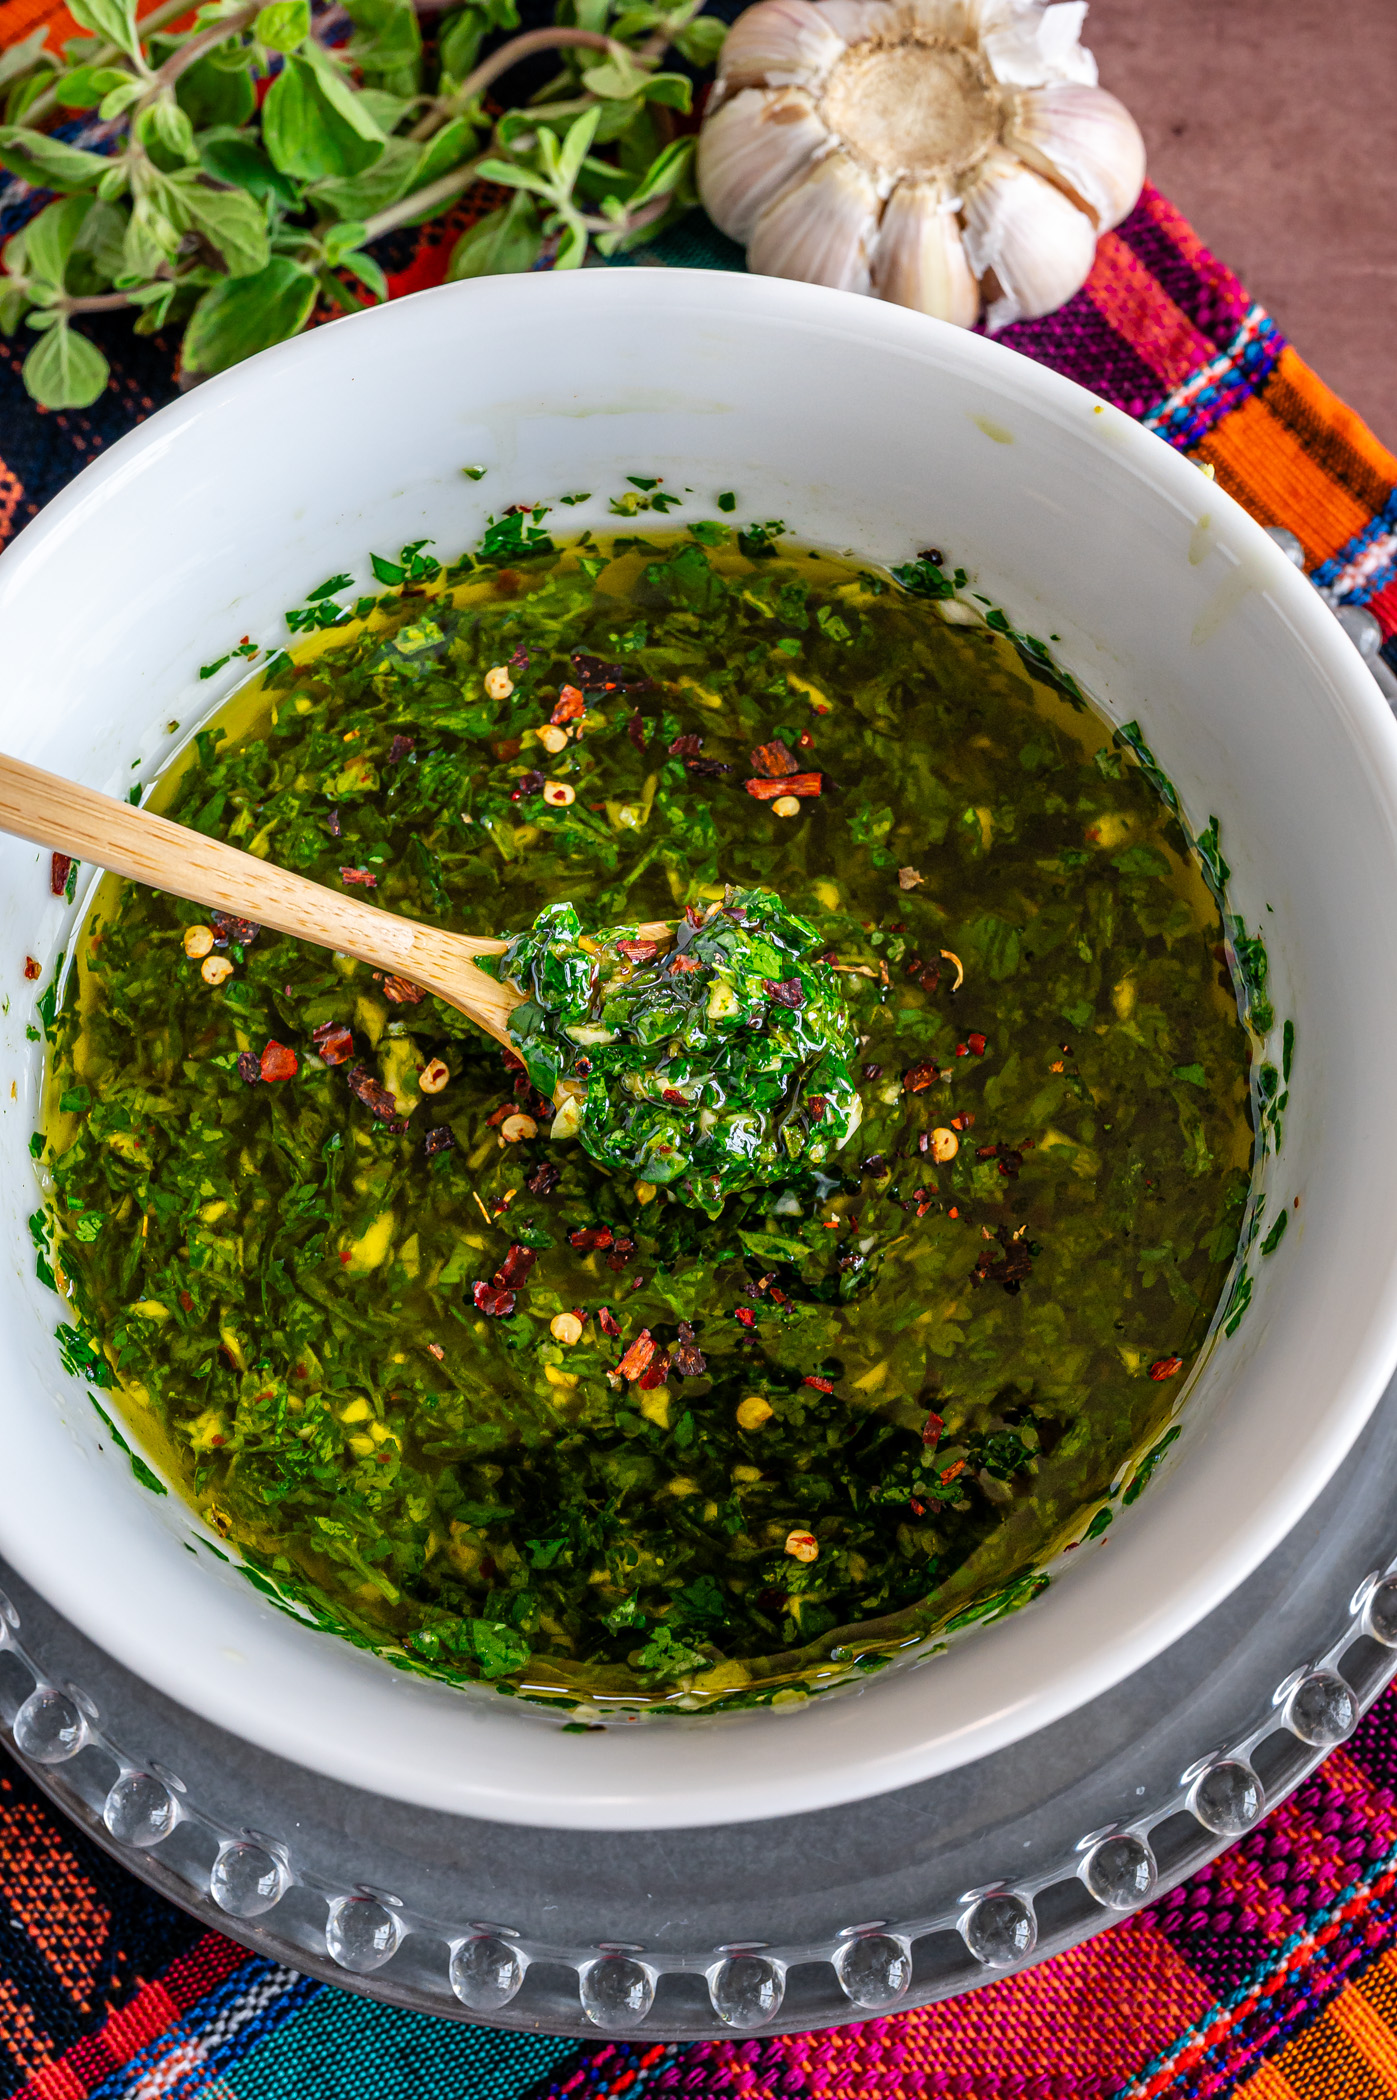
      • Use Chimichurri instead of the sun-dried tomato/olive oil mixture for an herby twist.
      • Spoon caramelized onions and Balsamic glaze over the cheese before baking.
      • Chopped crispy bacon and caramelized onions are great on Panela cheese.
      • For a sweet treat, spoon any kind of fruit jelly or jam instead.
      • Chopped olives, pimento peppers, and capers mixed with olive oil and lemon juice.
      • A mixture of Pesto, Parmesan cheese, and pine nuts would be great.

      Baked Panela Cheese with Sun-Dried Tomatoes

      Creamy, melty Baked Panela Cheese with Sun-Dried Tomatoes served over toasted baguette rounds is the best hot appetizer!
      Print Pin Rate
      Course: Appetizer
      Cuisine: Latin American
      Keyword: panela cheese, hot appetizer, sun-dried tomatoes
      Prep Time: 5 minutes minutes
      Cook Time: 15 minutes minutes
      Total Time: 20 minutes minutes
      Servings: 8
      Calories: 174kcal

      Equipment

      • small bowl
      • knife and cutting board
      • small baking dish

      Ingredients

      • 1 12 oz Panela cheese
      • ¼ cup olive oil
      • 3 garlic cloves minced
      • ⅓ cup sun-dried tomatoes finely chopped
      • 1 teaspoon Italian seasoning
      • ½ teaspoon Paprika
      • ½ teaspoon Red pepper flakes
      • ½ teaspoon salt or to taste
      • freshly ground black pepper to taste

      Instructions

      • Preheat the oven to 350 F.
      • Mix the olive oil, garlic, sun-dried tomatoes, Italian seasoning, paprika, red pepper flakes, salt, and pepper in a small bowl until well combined.
      • Place the Panela cheese in a small baking dish (I used a mini cast iron skillet), and spoon the sun-dried tomato mixture over it.
      • Bake, uncovered, for 15-20 minutes or until the cheese is starting to melt but still holds its shape. Serve while hot with toasted baguette rounds or crackers.

      Nutrition

      Calories: 174kcal | Carbohydrates: 2g | Protein: 8g | Fat: 14g | Saturated Fat: 6g | Polyunsaturated Fat: 0.75g | Monounsaturated Fat: 5g | Sodium: 148mg | Potassium: 92mg | Fiber: 0.5g | Sugar: 1g

      Slow Cooker Pork Carnitas with Green Tomatillo Sauce

      Jul 17, 2025 · Leave a Comment

      It is so easy to make Slow Cooker Pork Carnitas with Green Tomatillo Sauce, that you'll want to make them over and over again. You can use as taco filling, as an entree alongside rice or potatoes, and even add veggies like carrots, chayote, or green beans into the slow cooker for a full meal.

      The secret to make great carnitas is in the sauce and in browning the meat. Charring the veggies prior to blending them and browning the pork before placing it in the slow cooker adds great depth of flavor and gives the carnitas an authentic Mexican flavor.

      Ingredients for Slow Cooker Pork Carnitas

      • Pork tenderloin or pork shoulder. I like leaner carnitas, so I use tenderloin. Pork shoulder makes for more flavorful carnitas though.
      • Green tomatillos
      • Onion: yellow or white onions are both fine.
      • Garlic
      • Serrano chiles, or jalapeños
      • Fresh cilantro
      • Chile pasilla, or any other dried chile you have on hand (you can skip it if not available).
      • Olive oil
      • Bay leaf, salt, and pepeper

      How to Make Slow Cooker Pork Carnitas with Green Tomatillo Sauce

      1. Heat one cup of water in the microwave or stovetop for 90 seconds or until almost boiling. Place the Guajillo chile in the water for 10 minutes to rehydrate.

      2. Heat a griddle, comal, or large skillet over high heat and add the tomatillos, Serrano chile, onion, and garlic. Char them on all sides.

      3. Place the charred veggies in a blender, add the rehydrated Guajillo, ½ a cup of the rehydrating water, cilantro, salt, and pepper. Blend until well combined.

      4. Heat a large skillet over high heat and add the olive oil. Brown the pork tenderloins on all sides.

      5. Place the browned tenderloins into the slow cooker, pour the sauce over them, and add the bay leaf. Place the lid on and cook on low for 8 hours, or on high for 4.

      6. Remove the tenderloins from the slow cooker and shred them using two forks. They should be fork-tender. Try the sauce left in the slow cooker and add more salt if needed.

      7. Return the shredded meat to the slow cooker and mix it with the sauce.

      For crispy carnitas, spread the cooked pork in a baking sheet and broil for a few minutes in the oven until crispy and slightly charred.

      Tips to Make the Best Pork Carnitas:

      1. Brown the tenderloins on all sides prior to placing them in the slow cooker. This gives the carnitas a deeper, smoky flavor.
      2. Charring the veggies adds another layer of flavor and makes them taste like restaurant-style carnitas.
      3. Wait until the cooking time is over before you taste the sauce, and add more salt if needed.

      How to Serve Slow Cooker Pork Carnitas with Green Tomatillo Sauce

      • Use the meat as taco filling and top with your favorite taco toppings like sliced pickled onions, fresh cilantro, chopped avocado, and sour cream.
      • Serve as a main entree with freshly cooked rice or baked potato.
      • Add diced carrots, potatoes, chayote squash, and green beans to the slow cooker for a full meal. If doing this, add the whole cup of rehydrating water to make the sauce thinner.

      Slow Cooker Pork Carnitas with Green Tomatillo Sauce

      Tender slow cooked Pork Carnitas with zesty Green Tomatillo Sauce are the perfect taco filling or entree.
      Print Pin Rate
      Course: Main Course
      Cuisine: Mexican
      Keyword: slow cooker, pork carnitas, green tomatillo sauce
      Prep Time: 20 minutes minutes
      Cook Time: 8 minutes minutes
      Total Time: 8 hours hours 20 minutes minutes
      Servings: 10
      Calories: 195kcal

      Equipment

      • griddle or comal
      • large skillet
      • slow cooker

      Ingredients

      • 1 Dried Chile Guajillo
      • 12 Green tomatillos
      • ⅓ White onion
      • 4 Garlic cloves
      • 1 Serrano Chile or to taste
      • ⅓ cup Fresh cilantro leaves
      • 1 teaspoon salt or to taste
      • ¼ teaspoon freshly ground black pepper or to taste
      • 3 lbs pork tenderloins about 2 small
      • 1 tablespoon olive oil

      Instructions

      • Heat one cup of water in the microwave or stovetop for 90 seconds or until almost boiling. Place the Guajillo chile in the water for 10 minutes to rehydrate.
      • Heat a griddle, comal, or large skillet over high heat and add the tomatillos, Serrano chile, onion, and garlic. Char them on all sides.
      • Place the charred veggies in a blender, add the rehydrated Guajillo, ½ a cup of the rehydrating water, cilantro, salt, and pepper. Blend until well combined.
      • Heat a large skillet over high heat and add the olive oil. Brown the pork tenderloins on all sides.
      • Place the browned tenderloins into the slow cooker, pour the sauce over them, and add the bay leaf. Place the lid on and cook on low for 8 hours, or on high for 4.
      • Remove the tenderloins from the slow cooker and shred them using two forks. They should be fork-tender. Try the sauce left in the slow cooker and add more salt if needed.
      • Return the shredded meat to the slow cooker and mix it with the sauce.

      Nutrition

      Calories: 195kcal | Carbohydrates: 3g | Protein: 29g | Fat: 7g | Saturated Fat: 2g | Polyunsaturated Fat: 1g | Monounsaturated Fat: 3g | Cholesterol: 88mg | Sodium: 30mg | Potassium: 66mg | Fiber: 1g | Sugar: 2g

      Cheesy Chayote Sandwich

      Jun 11, 2025 · Leave a Comment

      Who needs bread when you can make a sandwich using low-calorie chayote? This Guatemalan recipe satisfies like a full meal. Pan-frying the whipped egg-wrapped sandwiches gives them a golden, rich crust, while keeping the cheese inside melted and gooey. Serve this low-carb Cheesy Chayote Sandwich over homemade tomato sauce with a drizzle of sour cream on top. If you've never tried recipes using chayote squash, I recommend you do!

      Ingredients for Chayote and Cheese Sandwich

      • Chayote squash
      • Panela cheese, or fresh mozzarella
      • Roma tomatoes
      • Onion
      • Garlic
      • Eggs
      • Dried oregano

      How to Make a Cheesy Chayote Sandwich:

      1. Make the homemade tomato sauce: place the tomatoes, onion, garlic, and ½ cup water in a medium-sized saucepan. Cook over medium heat until the tomatoes burst, about 7-8 minutes.

      2. Transfer to a blender, add ½ teaspoon salt, ½ teaspoon oregano, black pepper to taste, and blend until smooth. In the same saucepan, heat ½ tablespoon olive oil and add the sauce. Bring to a boil, reduce the heat, and simmer for 8-10 minutes. Set aside.

      3. While the sauce is cooking, place the chayote slices on a cutting board and sprinkle with them salt and pepper. Let them rest for 5 mins to release moisture, then pat dry with a paper towel. Make sandwiches using 2 slices of chayote with one slice of cheese in the middle. Sprinkle dry oregano over the cheese.

      4. Beat the egg whites until soft peaks form. Add the egg yolks and whisk again until frothy with soft peaks.

      5. Heat 1 ½ tablespoon of olive oil in a skillet over medium-how heat. While the oil is heating up, dip each sandwich into the egg mixture, then transfer to the skillet.

      6. Pan-fry the sandwiches on one side until golden brown, about 3-4 minutes. Flip, and cook on the other side for an additional 3-4 minutes. Keep the heat medium-low so the egg coating doesn't burn.

      7. Serve over the freshly made tomato sauce with a drizzle of sour cream on top. I added crushed pork rinds for crunch.

      Tips for Cooking Chayote Squash:

      • Adding salt to the chayote slices releases extra moisture. This helps the egg mixture stick to them better.
      • When moisture is released, the slices should be patted dry with a paper towel.
      • Keep the temperature on medium-low so the egg coating doesn't burn before the chayote is cooked through.
      • To make even slices, I like to slice the chayote in half and then each half in half again.

      Cheesy Chayote Sandwich

      Melted cheese sandwiched between two chayote squash slices and served over homemade tomato sauce make the best low-carb Cheesy Chayote Sandwich!
      Print Pin Rate
      Course: Side Dish
      Cuisine: Guatemalan, Latin American
      Keyword: chayote, low-carb sandwich, no-bread cheese sandwich
      Prep Time: 15 minutes minutes
      Cook Time: 20 minutes minutes
      Total Time: 35 minutes minutes
      Servings: 4 sandwiches
      Calories: 260kcal

      Equipment

      • blender
      • whisk or hand mixer
      • large skillet

      Ingredients

      • 2 medium Chayote squash peeled and sliced into 4 slices each
      • 4 slices (6 oz) Panela cheese or fresh mozzarella cheese
      • 4 medium Roma tomatoes
      • ¼ medium yellow onion
      • 2 cloves garlic
      • 1 teaspoon dry oregano divided
      • 1 teaspoon salt or to taste and divided
      • freshly cracked black pepper to taste
      • 2 large eggs whites and yolks separated
      • sour cream for serving
      • 2 tbs olive oil divided

      Instructions

      • Make the homemade tomato sauce: place the tomatoes, onion, garlic, and ½ cup water in a medium-sized saucepan. Cook over medium heat until the tomatoes burst, about 7-8 minutes.
      • Transfer to a blender, add ½ teaspoon salt, ½ teaspoon oregano, black pepper to taste, and blend until smooth. In the same saucepan, heat ½ tablespoon olive oil and add the sauce. Bring to a boil, reduce the heat, and simmer for 8-10 minutes. Set aside.
      • While the sauce is cooking, place the chayote slices on a cutting board and sprinkle with them salt and pepper. Let them rest for 5 mins to release moisture, then pat dry with a paper towel. Make sandwiches using 2 slices of chayote with one slice of cheese in the middle. Sprinkle dry oregano over the cheese.
      • Beat the egg whites until soft peaks form. Add the egg yolks and whisk again until frothy with soft peaks.
      • Heat 1 ½ tablespoon of olive oil in a skillet over medium-how heat. While the oil is heating up, dip each sandwich into the egg mixture, then transfer to the skillet.
      • Pan-fry the sandwiches on one side until golden brown, about 3-4 minutes. Flip, and cook on the other side for an additional 3-4 minutes. Keep the heat medium-low so the egg coating doesn't burn.
      • Serve over the freshly made tomato sauce with a drizzle of sour cream on top. I added crushed pork rinds for crunch.

      Nutrition

      Calories: 260kcal | Carbohydrates: 12g | Protein: 12.5g | Fat: 19g | Saturated Fat: 5g | Polyunsaturated Fat: 1g | Monounsaturated Fat: 5g | Sodium: 1274mg | Potassium: 168mg | Fiber: 3g | Sugar: 4g

      Roasted Whole Cauliflower with Chimichurri

      Jun 10, 2025 · Leave a Comment

      If you're looking for a stunning and great-tasting side dish that can be served either at a fancy dinner party or everyday weeknight dinner, Roasted Whole Cauliflower with Chimichurri is it! This show-stopping beauty is easy to make and big on flavor. Tangy, herby, garlicky, and slightly spicy, you'll like it so much, you will want to make it again and again!

      ingredients for Roasted Whole Cauliflower with Chimichurri

      • Whole Cauliflower
      • Olive oil
      • Dried oregano, ground cumin, paprika, and red pepper flakes, or the dried herbs you have on hand.
      • Salt and Pepper
      • Lime juice or lemon juice
      • Garlic
      • Homemade chimichurri or store-bought
      • Pepita seeds, optional for serving

      How to Make Roasted Cauliflower with Chimichurri

      1. Preheat the oven to 350 F.

      2. Mix the olive oil, herbs, spices, salt, pepper, lime juice, minced garlic, and chimichurri in a small bowl until well combined.

      3. Place the cauliflower on a baking sheet covered with parchment paper, and spread the oil mixture evenly on top using a silicone brush.

      4. Bake, uncovered, for 1 hour to 1 hour 20 minutes, depending on the size of the cauliflower, until a large wooden skewer can be inserted easily.

      Tips for the Best Roasted Whole Cauliflower

      • Make sure you cover the whole cauliflower with the oil mixture so each bite is full of flavor.
      • Reduce the amount of red pepper flakes if you don't like spicy food.
      • Serve with additional lime wedges for a tangier bite.
      • Start checking for doneness around the one hour mark, and then every 10 minutes until the skewer easily pierces the cauliflower.

      Roasted Whole Cauliflower with Chimichurri

      Herbs, Spices, Garlic, Olive oil, and Chimichurri make this Roasted Whole Cauliflower with Chimichurri a stunning and delicious side dish!
      Print Pin Rate
      Course: Side Dish
      Cuisine: Latin American
      Keyword: Roasted Cauliflower, Roasted Whole Cauliflower
      Prep Time: 5 minutes minutes
      Cook Time: 1 hour hour 15 minutes minutes
      Total Time: 1 hour hour 20 minutes minutes
      Servings: 6
      Calories: 135kcal

      Equipment

      • small bowl
      • silicone brush
      • baking sheet
      • oven

      Ingredients

      • 1 large cauliflower
      • ¼ cup olive oil
      • 1 lime juiced
      • 2 cloves garlic minced
      • 2 tablespoon homemade chimichurri
      • 1 teaspoon dried oregano
      • 1 teaspoon paprika
      • 1 teaspoon salt
      • ½ teaspoon ground cumin
      • freshly ground black pepper to taste
      • pepita seeds for serving optional

      Instructions

      • Preheat the oven to 350 F.
      • Mix the olive oil, herbs, spices, salt, pepper, lime juice, minced garlic, and chimichurri in a small bowl until well combined.
      • Place the cauliflower on a baking sheet covered with parchment paper, and spread the oil mixture evenly on top using a silicone brush.
      • Bake, uncovered, for 1 hour to 1 hour 20 minutes, depending on the size of the cauliflower, until a large wooden skewer can be inserted easily.

      Nutrition

      Calories: 135kcal | Carbohydrates: 6.5g | Protein: 2g | Fat: 12g | Saturated Fat: 2g | Polyunsaturated Fat: 1.3g | Monounsaturated Fat: 8.5g | Sodium: 430mg | Potassium: 326mg | Fiber: 2.5g | Sugar: 2g

      Mango Coconut Ice Cream

      Jun 10, 2025 · Leave a Comment

      The secret to making the best Mango Coconut Ice Cream is to use very ripe mangoes. I like Ataulfo mangos because they are sweeter than Tommy Atkins, yet still have a slightly tart aftertaste. You hardly need any sugar at all to make it if the mangoes are ripe enough. Adding coconut milk makes it creamy and smooth, while adding that characteristic tropical flavor!

      Ingredients for Mango Coconut Ice Cream

      • Ripe Mangoes: I like using Ataulfo mangoes, but you can use Tommy Atkins as well.
      • Coconut Milk: Unsweetened because the mangoes have enough sugar in them.
      • Lime juice or lemon juice to balance the sweetness in the mangoes
      • Sugar: white, brown, or calorie-free if needed

      How to Make Mango Coconut Ice Cream

      1. Place all ingredients in a blender, and blend until smooth.

      2. Place the resulting puree in an ice cream machine and churn until frozen. If you don't have an ice cream machine, place it in a freezer-safe container and into the freezer until almost frozen. Take it out, whisk in until smooth, and freeze until solid.

      3. To serve, let it stand at room temperature for about 2-3 minutes until slightly softened, scoop, and serve.

      Tips for making the Best Mango Ice Cream

      • Use very ripe mangos so you don't have to use too much sugar.
      • Blend all ingredients until they are really smooth.
      • If not using an ice cream machine, try to whisk the ice cream before it frozen solid at least twice. This will ensure a creamy, soft ice cream.

      Mango Coconut Ice Cream

      Ataulfo mangoes give the best flavor, while coconut cream makes Mango Coconut Ice Cream smooth and lush!
      Print Pin Rate
      Course: Dessert
      Cuisine: Latin American
      Keyword: homemade mango coconut ice cream, mango coconut ice cream, mango ice cream
      Prep Time: 10 minutes minutes
      Churn time: 15 minutes minutes
      Total Time: 25 minutes minutes
      Servings: 10 scoops
      Calories: 103kcal

      Equipment

      • blender
      • ice cream maker optional

      Ingredients

      • 4 large Ataulfo mangoes (about 4 cups diced)
      • ¾ cup coconut milk unsweetened
      • 1 lime juiced
      • ¼ cup granulated sugar

      Instructions

      • Place all ingredients in a blender, and blend until smooth.
      • Place the resulting puree in an ice cream machine and churn until frozen. If you don't have an ice cream machine, place it in a freezer-safe container and into the freezer until almost frozen. Take it out, whisk in until smooth, and freeze until solid.
      • To serve, let it stand at room temperature for about 2-3 minutes until slightly softened, scoop, and serve.

      Nutrition

      Serving: 1scoop | Calories: 103kcal | Carbohydrates: 18g | Protein: 1g | Fat: 3.5g | Saturated Fat: 2.8g | Sodium: 3mg | Potassium: 186mg | Fiber: 1.4g | Sugar: 16.5g

      Huevos Rancheros with Chimichurri

      Jun 6, 2025 · Leave a Comment

      Huevos Rancheros with Chimichurri

      I discovered these "fusion" Huevos Rancheros with Chimichurri by accident, and so it was that Mexico met Argentina in a skillet! I always keep a jar of Homemade Chimichurri in the fridge and it caught my eye as I was looking for the crema (or sour cream) to drizzle on my eggs. So, I thought it was a good idea to add some as well and let me tell you, there's no going back now!

      Ingredients for Huevos Rancheros with Chimichurri

      • Butter, or olive oil
      • Red onion, or your favorite onion
      • Green Bell Pepper, or any color bell pepper
      • Grape or Roma tomatoes
      • Eggs
      • Dry oregano and red pepper flakes (optional)
      • Cotija cheese, homemade chimichurri, and fresh cilantro for serving

      How to Make Huevos Rancheros

      1. Melt the butter in a large skillet over medium heat and sauté the sliced red onion until translucent, about 2-3 minutes. Keep an eye on the butter so it doesn't burn before adding the onion.

      2. Add the tomatoes, bell peppers, salt, pepper, oregano, red chili flakes, and ¼ cup water. Reduce the heat to medium-low, and simmer, covered, until the tomatoes are soft, about 5 minutes.

      3. Crack the eggs over the veggies, sprinkle a little more salt over the eggs, cover, and cook until the eggs are cooked to your liking.

      4. Serve with Mexican crema (or sour cream), chimichurri, Cotija cheese, and fresh cilantro on top.

      Tips for the Best Huevos Rancheros with Chimichurri

      • Remember to cover the skillet once you crack the eggs so they cook evenly on top.
      • Cover the skillet when cooking the veggies as well, so they don't dry out.
      • Serve with freshly toasted bread or over a corn tostada, with more chimichurri on the side.
      • Adding a little water to the veggies helps soften them and combined with the tomatoes, make a thick sauce.

      Huevos Rancheros with Chimichurri

      Mexico meets Argentina in these Huevos Rancheros with Chimichurri. Saucy, tangy, and creamy. With perfectly cooked whites and runny yolks!
      Print Pin Rate
      Course: Breakfast
      Cuisine: Mexican
      Keyword: huevos rancheros, skillet huevos rancheros
      Prep Time: 10 minutes minutes
      Cook Time: 20 minutes minutes
      Total Time: 30 minutes minutes
      Servings: 3
      Calories: 309kcal

      Equipment

      • 1 large skillet
      • knife and cutting board

      Ingredients

      • 1 tablespoon unsalted butter
      • ¼ cup red onion thinly sliced
      • 1 ½ cups grape tomatoes sliced in half
      • ½ green bell pepper thinly sliced
      • ½ teaspoon salt divided
      • ½ teaspoon dry oregano
      • ½ teaspoon red pepper flakes
      • freshly cracked black pepper to taste
      • 6 eggs
      • 3 tablespoon chimichurri for serving
      • 3 tablespoon Cotija cheese for serving
      • fresh cilantro for serving

      Instructions

      • Melt the butter in a large skillet over medium heat and sauté the sliced red onion until translucent, about 2-3 minutes.
      • Add the tomatoes, bell peppers, salt, pepper, oregano, red chili flakes, and ¼ cup water. Reduce the heat to medium-low, and simmer, covered, until the tomatoes are soft, about 5 minutes.
      • Crack the eggs over the veggies, sprinkle a little more salt over the eggs, cover, and cook until the eggs are cooked to your liking.
      • Serve with Mexican crema (or sour cream), chimichurri, Cotija cheese, and fresh cilantro on top.

      Nutrition

      Calories: 309kcal | Carbohydrates: 8g | Protein: 15g | Fat: 24g | Saturated Fat: 8g | Polyunsaturated Fat: 3g | Monounsaturated Fat: 11g | Cholesterol: 389mg | Sodium: 763mg | Potassium: 419mg | Fiber: 2g | Sugar: 1g

      Mexican Chicken Adobo with Potatoes

      Jun 4, 2025 · Leave a Comment

      Mexican Chicken Adobo with Potatoes

      Juicy chicken breast morsels are marinated in a smoky and tangy mixture of dried chilis, garlic, onion, vinegar, and fragrant herbs and spices for the best Mexican Chicken Adobo with Potatoes. Savor the flavors of Mexico with this wholesome restaurant-quality meal perfect for special occasions or any weeknight dinner. Did you know Adobo means Marinade?

      Ingredients for Mexican Chicken Adobo with Potatoes

      • Boneless, skinless chicken breasts, thighs, or bone-in chicken pieces
      • Potatoes, your favorite. I used Yukon gold
      • Oil, your favorite. I use olive or avocado
      • Dried chilis, guajillo and pasilla
      • Roma tomato, this is optional. I like a little tomato in my adobo
      • Vinegar, either white or apple cider vinegar
      • Onion and garlic
      • Herbs and spices, cumin seeds, dry oregano, and bay leaves
      • Salt and pepper

      How to Make Mexican Chicken Adobo

      1. Remove the stems and seeds from the dried chilis and soak them in warm water for 10 minutes.

      2. Place the soaked chilis, tomato, onion, garlic, cumin, vinegar, salt, and pepper into the blender. Add ½ cup of the soaking water and blend until smooth.

      3. Place the cubed chicken breasts in bowl or zipper bag, add the sauce, and mix to coat evenly. If using a bowl, cover with plastic wrap. Marinate in the refrigerator for at least 2 hours to overnight.

      4. Heat the oil in a large skillet over medium-high heat and sear the chicken pieces until lightly browned on all sides, about 5-6 minutes.

      5. Pour in one cup of water, two bay leaves (fresh or dried), ¼ cup of the marinade, and ½ teaspoon salt. Bring to a boil, reduce the heat and simmer, covered, for 30 minutes, stirring twice in between.

      6. Add the cubed potatoes and cook for an additional 15 minutes, stirring occasionally, until the potatoes are cooked through. Check the seasoning and add more salt if needed.

      7. Serve with a side of cooked white rice, steamed veggies, or salad.

      Tips to Make the Best Mexican Chicken Adobo with Potatoes

      • For best results, marinate chicken for as long as you can or up to 8 hours.
      • Soaking the chilis is an important so they develop their full flavor.
      • If you feel the sauce is too thin, let the chicken and adobo simmer uncovered.

      Mexican Chicken Adobo with Potatoes

      Mexican Chicken Adobo with Potatoes is made with dried chilis, onion, garlic, vinegar, herbs and spices for a smoky, tangy feast for your senses!
      Print Pin Rate
      Course: Main Course
      Cuisine: Mexican
      Keyword: Chicken Adobo with Potaotes, Mexican Chicken Adobo, Mexican Chicken Adobo with Potatoes
      Prep Time: 15 minutes minutes
      Cook Time: 45 minutes minutes
      Total Time: 1 hour hour
      Servings: 4
      Calories: 337kcal

      Equipment

      • blender
      • 1 mixing bowl
      • 1 large skillet
      • knife and cutting board

      Ingredients

      • 1 lb Boneless, skinless chicken breast cut into 2-inch cubes
      • 4 Yukon gold potatoes cut into 1-inch cubes
      • 2 Guajillo chilis
      • 2 Pasilla chilis
      • 1 Roma tomato optional
      • ¼ medium white onion
      • 3 cloves garlic
      • ¼ cup apple cider vinegar
      • 1 teaspoon dried oregano
      • ½ teaspoon cumin seeds
      • 2 bay leaves fresh or dried
      • 1 tsp salt or to taste
      • freshly cracked black pepper to taste
      • 1 cup water or chicken broth

      Instructions

      • Remove the stems and seeds from the dried chilis and soak them in warm water for 10 minutes.
      • Place the soaked chilis, tomato, onion, garlic, cumin, vinegar, salt, and pepper into the blender. Add ½ cup of the soaking water and blend until smooth.
      • Place the cubed chicken breasts in bowl or zipper bag, add the sauce, and mix to coat evenly. If using a bowl, cover with plastic wrap. Marinate in the refrigerator for at least 2 hours to overnight.
      • Heat the oil in a large skillet over medium-high heat and sear the chicken pieces until lightly browned on all sides, about 5-6 minutes.
      • Pour in one cup of water, two bay leaves (fresh or dried), ¼ cup of the marinade, and ½ teaspoon salt. Bring to a boil, reduce the heat and simmer, covered, for 30 minutes, stirring twice in between.
      • Add the cubed potatoes and cook for an additional 15 minutes, stirring occasionally, until the potatoes are cooked through. Check the seasoning and add more salt if needed.
      • Add the cubed potatoes and cook for an additional 15 minutes, stirring occasionally, until the potatoes are cooked through. Check the seasoning and add more salt if needed. Serve with a side of cooked white rice, steamed veggies, or salad.

      Nutrition

      Calories: 337kcal | Carbohydrates: 33g | Protein: 39g | Fat: 5g | Saturated Fat: 1g | Polyunsaturated Fat: 1g | Monounsaturated Fat: 1.5g | Cholesterol: 96mg | Sodium: 677mg | Potassium: 445mg | Fiber: 4g | Sugar: 4g

      Creole Shrimp (Camarones Criollos)

      Jun 3, 2025 · Leave a Comment

      Creole Shrimp

      Creole Shrimp (Camarones Criollos) are cooked in a tangy and slightly spicy tomato, onion, garlic, celery, and bell pepper "sofrito". With just a handful of easy-to-find sautéed veggies, you'll be able to create a mouthwatering and hearty dish in less than 30 minutes. Fresh and simple, Camarones Criollos just hit the spot!

      Ingredients for Creole Shrimp:

      • Shrimp: peeled and deveined.
      • Tomatoes: either Roma tomatoes, grape, or beef tomatoes.
      • Onion: use your favorite onion.
      • Garlic
      • Celery
      • Bell Pepper: your favorite colored bell pepper
      • Anaheim chili: this is optional, and you can use your favorite mild, medium, or hot chili like jalapeños.
      • Olive oil: or your favorite oil
      • Cornstarch: or flour to thicken the sauce
      • Chicken broth
      • Herbs and spices: dried thyme, bay leaf, dried parsley flakes, and paprika.
      • Salt and pepper

      How to Make Creole Shrimp:

      1. Heat the oil in a large skillet over medium heat, and sauté the onion, garlic, celery, and bell peppers until soft and fragrant, about 4-5 minutes.

      2. Add the tomatoes, Anaheim chili, herbs, spices, salt, and pepper, and cook until the tomatoes are soft, about 5 more minutes.

      3. Pour in the chicken broth and cornstarch slurry. Bring to a boil, reduce the heat to medium-low, and simmer for 10-12 minutes to let the flavors develop and the sauce thicken.

      4. Mix in the shrimp and cook for 2-3 minutes, just until they change color from grey to pink. Don't overcook them or they will turn out rubbery and tough. Sprinkle chopped parsley on top.

      5. Serve over freshly cooked rice and lime wedges on the side.

      Tips to Make the Best Creole Shrimp (Camarones Criollos):

      • Sauté the veggies until they are soft, so their flavor can fully develop. Don't rush this step.
      • If you don't have any spicy chilis, add ¼-1/2 teaspoon cayenne pepper.
      • Don't overcook the shrimp. Shrimp cook quickly, so don't leave them unattended.

      Creole Shrimp (Camarones Criollos)

      Perfectly cooked shrimp in a slightly spicy tomato, onion, garlic, celery, and bell pepper sofrito, are ready in about 30 minutes and will impress family and friends!
      Print Rate
      Course: Main Course
      Cuisine: Latin American
      Keyword: camarones criollos, creole shrimp, sofrito
      Prep Time: 10 minutes minutes
      Cook Time: 25 minutes minutes
      Total Time: 35 minutes minutes
      Servings: 4
      Calories: 142kcal

      Equipment

      • knife and cutting board
      • 1 large skillet

      Ingredients

      • 1 lb shrimp peeled and deveined
      • ⅓ cup onion chopped
      • ⅓ cup celery chopped
      • 3 cloves garlic minced
      • ½ Bell pepper (red or green) chopped
      • ½ Anaheim chili chopped (optional)
      • 3 large Roma tomatoes chopped
      • ½ teaspoon dried thyme
      • 1 teaspoon paprika
      • 1 teaspoon dried parsley flakes
      • 1 bay leaf
      • ½ teaspoon salt or to taste
      • freshly cracked bell pepper to taste
      • ¾ cup chicken broth
      • ½ tablespoon cornstarch mixed with 2 tablespoon water
      • fresh parsley chopped, for serving
      • lime wedges for serving

      Instructions

      • Heat the oil in a large skillet over medium heat, and sauté the onion, garlic, celery, and bell peppers until soft and fragrant, about 4-5 minutes.
      • Add the tomatoes, Anaheim chili, herbs, spices, salt, and pepper, and cook until the tomatoes are soft, about 5 more minutes.
      • Pour in the chicken broth and cornstarch slurry. Bring to a boil, reduce the heat to medium-low, and simmer for 10-12 minutes to let the flavors develop and the sauce thicken.
      • Mix in the shrimp and cook for 2-3 minutes, just until they change color from grey to pink. Don't overcook them or they will turn out rubbery and tough. Sprinkle chopped parsley on top.
      • Serve over freshly cooked rice and lime wedges on the side.

      Nutrition

      Calories: 142kcal | Carbohydrates: 7g | Protein: 22g | Fat: 3g | Saturated Fat: 0.25g | Polyunsaturated Fat: 0.75g | Monounsaturated Fat: 0.5g | Cholesterol: 170mg | Sodium: 623mg | Potassium: 305mg | Fiber: 1.5g | Sugar: 2.5g

      Yellow Rice (Arroz Amarillo)

      May 30, 2025 · Leave a Comment

      Yellow Rice

      Tired of eating boring white rice? Switch things up by making this fragrant Yellow Rice (Arroz Amarillo). Sautéed onions, garlic, and bell peppers along with turmeric and chicken broth transform simple white rice into a side dish worthy of any gourmet entree!

      Ingredients for Yellow Rice:

      • Long-grain white rice or your favorite such as Basmati or Jazmine.
      • Onion, you can use ½ teaspoon of onion powder in a pinch.
      • Garlic you can use ¼ teaspoon garlic powder in a pinch.
      • Bell pepper, any color you like. I think red makes a great contrast with the yellow in the rice.
      • Turmeric to give color and fragrance
      • Butter to sauté the vegetables, but you can also use olive oil.
      • Chicken broth or water if you prefer, but using broth is highly recommended.

      How to Make This Yellow Rice:

      1. Heat the butter in a large saucepan over medium-high heat, sauté the onions, garlic, and bell peppers until fragrant and soft, about 3-4 minutes.

      2. Mix in the rice, turmeric, salt, and pepper, and sauté for 3 more minutes.

      3. Pour in the chicken broth, bring to a boil, reduce the heat, and simmer, covered, until all the water has been absorbed, about 15-20 minutes.

      • I like to serve this dish with Roasted Peruvian Chicken Breasts and Peruvian Green Sauce! Check these recipes out.

      Tips for Making the Best Yellow Rice (Arroz Amarillo):

      • Sautéing the rice along with the veggies makes a fluffier rice, prevents clumping, and helps develop a much better flavor.
      • Butter makes the rice taste creamy, but you can use olive oil for a vegetarian option.
      • Chicken broth imparts great flavor, but use water for a vegetarian rice.
      • Cook the rice on low heat and covered. Keep an eye on it to make sure it doesn't burn or stick to the bottom.

      Yellow Rice (Arroz Amarillo)

      Adding sautéed onions, garlic, bell pepper, and turmeric turns boring white rice into this fragrant Yellow Rice, a masterpiece!
      Print Pin Rate
      Course: Side Dish
      Cuisine: Latin American
      Keyword: arroz amarillo, rice side dish, yellow rice, yellow rice recipe
      Prep Time: 10 minutes minutes
      Cook Time: 20 minutes minutes
      Total Time: 30 minutes minutes
      Servings: 4
      Calories: 228kcal

      Equipment

      • Medium-sized saucepan
      • knife and cutting board

      Ingredients

      • ½ yellow onion finely chopped
      • 2 cloves garlic minced
      • ½ medium red bell pepper finely chopped
      • 1 cup long-grain white rice uncooked
      • 1 teaspoon turmeric
      • 2 teaspoon salt or to taste
      • freshly cracked black pepper to taste
      • 1 cups low-sodium chicken broth
      • 1 tablespoon unsalted butter

      Instructions

      • Heat the butter in a large saucepan over medium-high heat, sauté the onions, garlic, and bell peppers until fragrant and soft, about 3-4 minutes.
      • Mix in the rice, turmeric, salt, and pepper, and sauté for 3 more minutes.
      • Pour in the chicken broth, bring to a boil, reduce the heat, and simmer, covered, until all the water has been absorbed, about 15-20 minutes. Turn off the heat and fluff with a fork.

      Nutrition

      Calories: 228kcal | Carbohydrates: 39g | Protein: 3.5g | Fat: 5g | Saturated Fat: 2g | Polyunsaturated Fat: 1g | Monounsaturated Fat: 1g | Cholesterol: 7.5mg | Sodium: 619mg | Potassium: 212mg | Fiber: 0.5g | Sugar: 1g

      Roasted Peruvian Chicken Breasts

      May 30, 2025 · Leave a Comment

      Roasted Peruvian Chicken Breasts

      The thought of Roasted Peruvian Chicken Breasts with green sauce and yellow rice makes my mouth water. This recipe is on repeat on my dinner rotation every week, and I keep a bottle of Peruvian Green Sauce in the fridge. The chicken breasts come out tender and juicy, and if I have some leftover, they make the most amazing wrap filling!

      Ingredients for Roasted Peruvian Chicken Breasts:

      • Large Boneless, Skinless Chicken Breasts or your favorite cut of chicken. Bone-in or boneless cuts are perfect for this recipe.
      • Garlic, minced finely to permeate the chicken
      • Soy sauce, reduced-sodium soy sauce, gluten-free soy sauce, or coconut aminos.
      • Lime juice or lemon juice
      • Olive oil or your favorite oil
      • Herbs and spices: cumin, paprika, dried oregano.

      How to Make Peruvian Roasted Chicken Breasts:

      1. Combine the olive oil, lime juice, minced garlic, paprika, dried oregano, ground cumin, salt, and pepper in a shallow bowl. Add the chicken breasts until well covered in the marinade. Cover and marinate for at least 4 hours and up to 24.

      2. Preheat the oven to 375 F and heat the olive oil in an oven-safe skillet over medium-high heat. Place the chicken breasts in the skillet and don't touch them for 3-4 minutes until nicely brown. Flip them and brown them on the other side for 3 another 3 minutes.

      3. Transfer the chicken breasts to the oven and roast for 18-25 minutes or until fully cooked and their internal temperature of the chicken reaches 165 F.

      • Serve over Yellow Rice with Peruvian Green Sauce on top!

      Tips to Make the Best Roasted Peruvian Chicken Breasts:

      • The longer you marinate the chicken, the better its flavor. If you can, let it marinate overnight, or for at least 4 hours.
      • Make sure your oven is well calibrated so you know exactly what temperature you're using.
      • Don't overcook the chicken or it will turn out dry and tough. Keep an eye on it and cook it just until the juices run clear.

      Roasted Peruvian Chicken Breasts

      Transform bland chicken breasts in to mouthwatering Roasted Peruvian Chicken by marinating it with garlic, herbs, and spices and serving it with Peruvian green sauce.
      Print Pin Rate
      Course: Main Course
      Cuisine: Latin American, Peruvian
      Prep Time: 10 minutes minutes
      Cook Time: 20 minutes minutes
      Marinating time: 4 hours hours
      Total Time: 4 hours hours 30 minutes minutes

      Equipment

      • shallow bowl
      • cast-iron or oven-safe skillet

      Ingredients

      • 2 large boneless, skinless chicken breasts
      • 3 garlic cloves
      • ¼ cup soy sauce
      • 2 tablespoon lime juice
      • 1 tablespoon olive oil
      • 1 teaspoon ground cumin
      • 1 teaspoon paprika
      • ½ teaspoon dried oregano
      • freshly cracked black pepper to taste

      Instructions

      • Combine the olive oil, lime juice, minced garlic, paprika, dried oregano, ground cumin, salt, and pepper in a shallow bowl. Add the chicken breasts until well covered in the marinade. Cover and marinate for at least 4 hours and up to 24.
      • Preheat the oven to 375 F and heat the olive oil in an oven-safe skillet over medium-high heat. Place the chicken breasts in the skillet and don't touch them for 3-4 minutes until nicely brown. Flip them and brown them on the other side for 3 another 3 minutes.
      • Transfer the chicken breasts to the oven and roast for 18-25 minutes or until fully cooked and their internal temperature of the chicken reaches 165 F.

      Peruvian Green Sauce (Aji Verde)

      May 30, 2025 · Leave a Comment

      Peruvian Green Sauce

      Peruvian Green Sauce (Aji Verde) is creamy, tangy, and spicy. It gets its green color from cilantro, green onions, and jalapeños. You'll love it over grilled chicken, beef, fish, or even over rice. It's usually made with mayonnaise, but you can make it with Greek yogurt to reduce the calories.

      If you've ever wondered how the green sauce they give you at any Peruvian restaurant is made, you don't have to wonder any more. Now you can make it at home.

      Peruvian Green Sauce is also great as a dip with chips or raw veggies, or as a condiment for dressing sandwiches and wraps.

      Ingredients for Peruvian Green Sauce (Aji Verde):

      • Cilantro, leaves and stalks are ok
      • Green onions, green part
      • Jalapenos with seeds if you like your sauce spicy, and without if you want it mild. You could also use aji Amarillo (yellow Peruvian chilis) if you can find them.
      • Olive oil or avocado oil
      • Mayonnaise or Greek yogurt for fewer calories
      • Garlic. The amount of garlic can be adjusted to your taste. Add one more clove if you love garlic, or less if you don't love it.
      • Salt and pepper

      How to Make Peruvian Green Sauce:

      • Place all ingredients in a blender and blend until smooth.

      Tips for Making the Best Peruvian Green Sauce (Aji Verde):

      • Remove the seeds from the jalapeños if you don't like your sauce too spicy.
      • Use only the green parts of the onions.
      • Add the lime juice and mayo to the blender first to make it easier for the other ingredients to blend in.
      • Keep Peruvian Green Sauce in the fridge for up to one week stored in an airtight container. I don't recommend freezing this sauce.

      If you like this recipe, you'll love these as well:

      • Peruvian Roasted Chicken Breasts
      • Yellow Rice

      Peruvian Green Sauce (Aji Verde)

      Peruvian Green Sauce gets its color from cilantro, green onions, and jalapeños. Mayo makes it creamy, and lime juice makes it tangy!
      Print Pin Rate
      Course: Side Dish
      Cuisine: Latin American, Peruvian
      Keyword: Aji Verde, Peruvian Green Sauce
      Prep Time: 10 minutes minutes
      Total Time: 10 minutes minutes
      Servings: 16 ( 1 cup )
      Calories: 78kcal

      Equipment

      • blender

      Ingredients

      • 1 cup cilantro leaves
      • 3 garlic cloves
      • 4 green onions green part only
      • 2 jalapeños seeds removed
      • 1 lime juiced
      • ¾ cup mayonnaise
      • 2 tablespoon olive oil
      • ¼ teaspoon salt or to taste
      • freshly cracked black pepper to taste

      Instructions

      • Place all ingredients in a blender and blend until smooth.

      Nutrition

      Calories: 78kcal | Carbohydrates: 1g | Protein: 0.25g | Fat: 8g | Saturated Fat: 1g | Polyunsaturated Fat: 5g | Monounsaturated Fat: 2g | Cholesterol: 4mg | Sodium: 125mg | Potassium: 20mg | Fiber: 0.25g

      Beef and Tomato Soup with Couscous

      May 30, 2025 · Leave a Comment

      Beef and Tomato Soup with Couscous

      No canned tomatoes are used to make this hearty Beef and Tomato Soup with Couscous. Simple and wholesome ingredients like tomatoes, onions, garlic, celery, lean beef, and pearl couscous is all you need to make this spectacular meal, perfect for a chilly day or when you're craving something satisfying.

      When making this soup, I mistakenly defrosted beef tenderloin thinking it was a different cut of meat. I had to use it, and I don't regret it! I know it's too expensive to use on soup, but the result was a mouthwatering, amazing-tasting soup I will make again!

      Ingredients for Beef and Tomato Soup with Couscous:

      • Beef Tender Loin I know this is an expensive cut of beef for soup, but I mistakenly took it out of the freezer thinking it was something else. I had to use it and was blown away by the flavor of the soup. You can use a less expensive cut like chuck roast.
      • Olive oil or your favorite oil
      • Roma tomatoes: or beef tomatoes are good for this recipe
      • Onion and garlic
      • Celery
      • Flat leaf (Italian) parsley
      • Pearl Couscous or any tiny pasta like Acini ni Pepe or Pastina
      • Beef broth or chicken broth

      How to Make Beef and Tomato Soup with Couscous:

      1. Place the tomatoes, onion, garlic, and ½ cup water in a medium-sized saucepan. Cook over medium heat until the tomatoes start to burst about 5 minutes. Transfer the veggies along with 2 cups of broth to a blend and blend until smooth.

      2. In a large pot, heat the olive oil over high heat and brown the beef for 3 minutes on both sides until nicely seared. Season with salt and pepper.

      3. Pour the tomato sauce and 2 remaining cups of beef broth over the meat and bring to a boil. Reduce the heat to medium-low and simmer for 20-30 minutes. Transfer the meat to a cutting board, shred, and return to the pot.

      4. Add the celery, parsley, and couscous, and simmer until the couscous is cooked through, about 10 more minutes. Check the seasoning and add more salt if needed.

      Tips for Making the Best Beef and Tomato Soup:

      • Browning the meat develops complex flavors that make the soup taste better, don't skip this step.
      • You can add veggies like carrots, potatoes, and zucchini if you want to make this soup a more complete meal.
      • Use a less expensive cut of beef like chuck roast if you don't wan to experiment with beef tenderloin!

      Beef and Tomato Soup with Couscous

      Beef and Tomato Soup with Couscous is made from fresh tomatoes onions, garlic, celery, cilantro, and couscous, for a satisfying and hearty meal!
      Print Pin Rate
      Course: Soup
      Cuisine: Latin American
      Keyword: Beef and Tomato Soup, beef soup, Soup with Couscous
      Prep Time: 10 minutes minutes
      Cook Time: 40 minutes minutes
      Total Time: 50 minutes minutes
      Servings: 4
      Calories: 414kcal

      Equipment

      • blender
      • large pot

      Ingredients

      • 1 lb beef tenderloin or chuck roast
      • 4 Roma tomatoes
      • ¼ medium onion
      • 1 clove garlic
      • 4 cups beef broth
      • ¼ cup fresh parsley chopped
      • ½ cup celery chopped
      • ½ cup pearl couscous
      • 1 teaspoon salt or to taste
      • freshly cracked black pepper to taste

      Instructions

      • Place the tomatoes, onion, garlic, and ½ cup water in a medium-sized saucepan. Cook over medium heat until the tomatoes start to burst about 5 minutes. Transfer the veggies along with 2 cups of broth to a blend and blend until smooth.
      • In a large pot, heat the olive oil over high heat and brown the beef for 3 minutes on both sides until nicely seared. Season with salt and pepper.
      • Pour the tomato sauce and 2 remaining cups of beef broth over the meat and bring to a boil. Reduce the heat to medium-low and simmer for 20-30 minutes. Transfer the meat to a cutting board, shred, and return to the pot.
      • Add the celery, parsley, and couscous, and simmer until the couscous is cooked through, about 10 more minutes. Check the seasoning and add more salt if needed.

      Nutrition

      Calories: 414kcal | Carbohydrates: 17g | Protein: 27g | Fat: 26g | Saturated Fat: 10g | Polyunsaturated Fat: 1g | Monounsaturated Fat: 11g | Cholesterol: 80mg | Sodium: 1549mg | Potassium: 820mg | Fiber: 2g | Sugar: 2g

      Roasted Chicken Drumsticks with Chimichurri

      May 30, 2025 · Leave a Comment

      Chicken Drumsticks

      Roasted Chicken Drumsticks go from regular to amazing by marinating them in homemade Chimichurri. Surprise your family with this very flavorful dish that comes together in no time and is perfect for any weeknight dinner. Pair them with your favorite rice or potatoes side dish and you're all set!

      Ingredients for Roasted Chicken Drumsticks with Chimichurri:

      • Chicken drumsticks. This recipe is great with any cut of chicken!
      • Spices: mustard powder and paprika. If you like spice, you can add a touch of cayenne as well.
      • Herbs: dry parsley and oregano. You can use basil as well.
      • Homemade Chimichurri, or you can use store-bought as well
      • Salt and pepper

      How to Make Chimichurri Chicken Drumsticks:

      1. Pat dry the chicken drumsticks with paper towels so the seasonings can properly adhere to them.

      2. Place the dry drumsticks in a large bowl and add the herbs, spices, salt, pepper, and chimichurri. Mix until all the drumsticks are well seasoned. Cover with plastic wrap and refrigerate at least 30 to 2 hours.

      3. Preheat the oven to 400 F and place the drumsticks on a baking rack placed over a baking sheet. Roast for 30-40 minutes or until cooked through and the internal temperature of the chicken reaches 165 F.

      • Serve with extra Chimichurri on the side

      Tips to Make the Best Chicken Drumsticks with Chimichurri:

      • The longer you marinate the drumsticks, the better the flavor!
      • Baking the drumsticks on a baking rack ensures they brown on all sides. If you don't have a baking rack, use a baking sheet and flip the drumsticks mid-cooking.
      • Patting dry the drumsticks is a pro move that helps the seasonings stick to them.

      Roasted Chicken Drumsticks with Chimichurri

      Marinating drumsticks in homemade Chimichurri sauce elevates them to gourmet quality!
      Print Pin Rate
      Course: Main Course
      Cuisine: Latin American
      Keyword: chimichurri recipe, Roasted chicken drumsticks
      Prep Time: 10 minutes minutes
      Marinating time: 30 minutes minutes
      Total Time: 40 minutes minutes
      Servings: 5
      Calories: 389kcal

      Equipment

      • baking rack and sheet
      • large mixing bowl
      • oven

      Ingredients

      • 10 chicken drumsticks
      • 1 tsp mustard powder
      • 1 tsp paprika
      • 1 teaspoon dry parsley flakes
      • 1 teaspoon dry oregano
      • 1 teaspoon salt
      • freshly cracked back pepper to taste
      • ⅓ cup chimichurri

      Instructions

      • Pat dry the chicken drumsticks with paper towels so the seasonings can properly adhere to them.
      • Place the dry drumsticks in a large bowl and add the herbs, spices, salt, pepper, and chimichurri. Mix until all the drumsticks are well seasoned. Cover with plastic wrap and refrigerate at least 30 to 2 hours.
      • Preheat the oven to 400 F and place the drumsticks on a baking rack placed over a baking sheet. Roast for 30-40 minutes or until cooked through and the internal temperature of the chicken reaches 165 F.

      Nutrition

      Calories: 389kcal | Carbohydrates: 0.3g | Protein: 44g | Fat: 22g | Saturated Fat: 4g | Polyunsaturated Fat: 3g | Monounsaturated Fat: 6g | Cholesterol: 231mg | Sodium: 179mg | Potassium: 495mg | Fiber: 0.4g

      Chimichurri Recipe

      May 30, 2025 · Leave a Comment

      Chimichurri Recipe

      Chimichurri makes any meal better instantly. This aromatic mixture of herbs, garlic, oil, and vinegar can be used to top anything from Carne Asada and grilled chicken to steamed fish or scrambled eggs, or any other recipe you can think of! It is so easy to make, I always keep a bottle in my fridge or freezer. Save this Chimichurri recipe for your next barbecue and impress your friends and family!

      Ingredients for Chimichurri:

      • Cilantro you can use the leaves and some stems too
      • Flat leaf or Italian Parsley use mostly leaves
      • Fresh oregano, or dry (use one-third the amount if using dry)
      • Garlic
      • Olive oil, you can use extra virgin or lite olive oil
      • Red wine vinegar
      • Red pepper flakes are optional
      • Salt and pepper

      How to Make Chimichurri:

      1. Place all ingredients in a food processor and pulse until well combined and finely chopped.

      Tips for Making the Best Chimichurri:

      • This Chimichurri recipe calls for all fresh herbs. Using fresh oregano really makes a difference in flavor, color, and texture.
      • If you like a more tangy chimichurri, use more vinegar, and if you like it less tangy, use less.
      • You can also adjust the amount of garlic depending on your preference.
      • Some people like a very finely chopped chimichurri, others like a more chunky one. Pulse the ingredients until it reaches the consistency you like.
      • You can store Chimichurri in an airtight container in the fridge for up to 3 weeks.
      • Chimichurri can also be frozen for up to 6 months.
      • Keep a bottle in your fridge or freezer to elevate any meal!

      If you like Chimichurri, take a look at these other recipes:

      • Carne Asada Marinade
      • Shakshuka with Cilantro and Chimichurri
      • Chimichurri Chicken Drumsticks

      Chimichurri Recipe

      A few teaspoons of this easy and quick Chimichurri recipe that includes fresh herbs like cilantro, parsley, and oregano can make any meal better instantly!
      Print Pin Rate
      Course: Side Dish
      Cuisine: Argentinian, Latin American
      Keyword: chimichurri recipe, easy chimichurri, fresh herbs, quick recipe
      Prep Time: 10 minutes minutes
      Total Time: 10 minutes minutes
      Servings: 16 tbsp (1 cup)
      Calories: 64kcal

      Equipment

      • food processor (not essential)

      Ingredients

      • 1 cup fresh flat-leaf (Italian) parsley leaves
      • ½ cup fresh cilantro leaves
      • 2 tablespoon fresh oregano leaves
      • 4 cloves garlic
      • ½ cup olive oil
      • ⅓ cup red wine vinegar
      • ½ teaspoon red pepper flakes
      • ½ teaspoon salt or to taste
      • freshly cracked black pepper to taste

      Instructions

      • Place all ingredients in a food processor and pulse until well combined and finely chopped. Check the seasoning and add more salt if needed.

      Notes

      • You can store Chimichurri in an airtight container in the fridge for up to 3 weeks.
      • Chimichurri can also be frozen for up to 6 months.
      • Keep a bottle in your fridge or freezer to elevate any meal!

      Nutrition

      Serving: 1tablespoon | Calories: 64kcal | Carbohydrates: 1g | Protein: 0.2g | Fat: 7g | Saturated Fat: 1g | Polyunsaturated Fat: 0.7g | Monounsaturated Fat: 5g | Sodium: 76mg | Potassium: 34mg | Fiber: 0.2g

      Beef Stew (Carne Guisada)

      May 30, 2025 · Leave a Comment

      Beef Stew

      This recipe for Carne Guisada or Beef Stew, is special because it is cooked in a homemade tomato sauce made with dried chiles. They give the stew an earthy, almost smoky flavor that's very unique. Slow simmered until the meat is fork tender and served with freshly steamed rice, this is the perfect meal for a chilly day!

      Ingredients and Substitutions for Beef Stew (Carne Guisada):

      • Beef Chuck Roast is widely used for stewed beef, but you can use round steak, brisket, or beef shank as well.
      • Guajillo chiles make this dish unique but you don't have to add them if you don't have any.
      • Roma tomatoes or beef tomatoes
      • Onion and garlic
      • Cilantro (recommended but not essential)
      • Carrots
      • Potatoes (any type of potatoes)
      • White mushrooms were the ones I had on hand, but you can use your favorite mushrooms, or omit them altogether.
      • Bay leaf
      • Chicken bouillon cube or extra salt.
      • Olive oil, avocado, or your favorite oil.

      How to Make Beef Stew (Carne Guisada):

      1. Place the tomatoes, onion, garlic, and guajillo chiles in a medium-sized saucepan with ½ cup water, and simmer, covered, until the tomatoes start to burst, about 6-8 minutes.

      2. While the tomatoes are cooking, heat the oil in a large pot over medium-high heat, and place the beef cubes inside in a single layer. Don't touch them for 2-3 minutes until nicely browned, then flip and cook on all other sides until brown.

      3. Place the cooked tomatoes, onion, garlic, chiles, chicken bouillon, cilantro, salt, and pepper in the blender, and blend until smooth. Pour over the brown beef and add the bay leaf. Bring to boil, reduce the heat, and simmer, covered, for 30-40 minutes, or until the meat is fork-soft.

      4. Add the cubed potatoes and sliced carrots and simmer until firm-tender, about 8 minutes.

      5. Mix in the mushrooms and cook for 3-5 minutes more until soft. Check the seasoning and add more salt, if needed. Serve with freshly cooked white rice.

      Tips for Making the Best Beef Stew (Carne Guisada):

      • Browning the beef is a crucial step for developing complex flavors. Don't skip this step.
      • If you need to brown the beef cubes in batches, take the time to do this. Don't overcrowd the pot or the beef will steam instead of browning.
      • The mushrooms should be added at the end because they cook quicker than carrots and potatoes.
      • Always check the seasoning at the end of the cooking time and add more salt, if needed.

      Beef Stew (Carne Guisada)

      Beef Stew (Carne Guisada) turns into a very authentic Latin American dish by making the homemade tomato sauce with dried chiles and cilantro!
      Print Pin Rate
      Course: Main Course
      Cuisine: Guatemalan, Latin American
      Keyword: beef stew, beef stew with vegetables, carne guisada, slow-cooked beef stew
      Prep Time: 20 minutes minutes
      Cook Time: 1 hour hour
      Total Time: 1 hour hour 20 minutes minutes

      Equipment

      • medium saucepan
      • knife and cutting board
      • large pot
      • blender
      • stovetop

      Ingredients

      • 5 Roma tomatoes
      • ⅓ medium white onion
      • 2 cloves garlic
      • 2 Guajillo chiles
      • 1 ½ lb Beef chuck cut into 1-inch cubes
      • 1 cube chicken bouillon
      • 1 teaspoon salt or to taste
      • freshly cracked black pepper to taste
      • 1 bay leaf
      • 3 medium carrots cut into 1-inch slices
      • 3 Yukon gold potatoes cut into 1-inch cubes
      • 8 oz white mushrooms

      Instructions

      • Place the tomatoes, onion, garlic, and guajillo chiles in a medium-sized saucepan with ½ cup water, and simmer, covered, until the tomatoes start to burst, about 6-8 minutes.
      • While the tomatoes are cooking, heat the oil in a large pot over medium-high heat, and place the beef cubes inside in a single layer. Don't touch them for 2-3 minutes until nicely browned, then flip and cook on all other sides until brown.
      • Place the cooked tomatoes, onion, garlic, chiles, chicken bouillon, cilantro, salt, and pepper in the blender, and blend until smooth. Pour over the brown beef and add the bay leaf. Bring to boil, reduce the heat, and simmer, covered, for 30-40 minutes, or until the meat is fork-soft.
      • Add the cubed potatoes and sliced carrots and simmer until firm-tender, about 8 minutes.
      • Mix in the mushrooms and cook for 3-5 minutes more until soft. Check the seasoning and add more salt, if needed. Serve with freshly cooked white rice.

      Chirmol Recipe (Guatemalan Salsa)

      May 30, 2025 · Leave a Comment

      Chirmol Recipe

      Chirmol, or Guatemalan salsa, is different from regular salsa in that Chirmol has spearmint (hierbabuena) added to it. This gives it a very fresh flavor. Charred tomatoes also give this aromatic salsa its unique flavor. You can add it to eggs, Carne Asada, tacos, or just about anything! Save this Chirmol recipe for your next barbecue!

      Chirmol is a Mayan word that means "runny nose", surely because people may have added spicy chiles that made their noses run.

      Ingredients and Substitutions for Chirmol (Guatemalan Salsa):

      • Roma tomatoes with seeds removed. You can use any tomatoes you have on hand, like beef, grape, heirloom, or cherry.
      • Onion: mostly, white or yellow onions are used, but you can use red onion as well.
      • Cilantro, freshly chopped
      • Spearmint (mint), freshly chopped
      • Lime juice or lemon juice. Just a little goes a long way in this recipe. Don't add too much.
      • Salt and pepper

      How to Make Chirmol (Guatemalan salsa):

      1. Heat a comal or griddle over high heat and charr the tomatoes. You can also char them over an open flame.

      2. Chop the tomatoes finely (including the charred skin).

      3. Mix the chopped, charred tomatoes, finely chopped onion, cilantro, mint, sal, pepper, and lime juice in a medium-sized bowl until well combined.

      Tips to Make the Best Chirmol Recipe:

      • Charring the tomatoes and adding mint is what makes an authentic Chirmol. You could try it with your eyes closed and recognize it by its flavor.
      • Chop the onion finely. No one wants to chew on a huge piece of onion.
      • Start by adding a teaspoon of lime juice. It really doesn't need much more, but you can add a little more if you want. Be careful, don't add too much or it will taste like ceviche!
      • Pair this fragrant salsa with my best Carne Asada Marinade recipe and my Easy Corn Tortillas recipe.

      Chirmol Recipe (Guatemalan Salsa)

      Charred tomates and the addition of chopped mint leaves as well as cilantro make this fragrant salsa recipe unique!
      Print Pin Rate
      Course: Side Dish
      Cuisine: Central American, Guatemalan
      Keyword: chirmol, guatemalan chirmol, salsa with mint, tomato salsa
      Prep Time: 20 minutes minutes
      Total Time: 20 minutes minutes
      Calories: 14kcal

      Equipment

      • comal or griddle
      • knife and cutting board

      Ingredients

      • 4 large Roma tomatoes (about 3 cups chopped)
      • ½ cup onion finely chopped
      • 1 tablespoon cilantro finely chopped
      • 2 teaspoon fresh mint finely chopped
      • 1 teaspoon lime juice or to taste
      • ½ teaspoon salt or to taste
      • freshly cracked black pepper

      Instructions

      • Heat a comal or griddle over high heat and charr the tomatoes. You can also char them over an open flame.
      • Chop the tomatoes finely (including the charred skin).
      • Mix the chopped, charred tomatoes, finely chopped onion, cilantro, mint, sal, pepper, and lime juice in a medium-sized bowl until well combined.

      Nutrition

      Calories: 14kcal | Carbohydrates: 2g | Protein: 0.5g | Fat: 0.5g | Polyunsaturated Fat: 0.3g | Sodium: 196mg | Potassium: 108mg | Fiber: 0.7g | Sugar: 1g

      Carne Asada Marinade

      May 29, 2025 · Leave a Comment

      Carne Asada Marinade

      Get ready for summer grilling with your very own Carne Asada Marinade. Impress your friends and family with juicy and flavorful carne asada, perfect for tacos, or served alongside grilled veggies, Guatemalan salsa (Chirmol), and Cilantro-Lime rice!

      Ingredients for Carne Asada Marinade:

      • Skirt Steak: You can also use Flank Steak, Sirloin, or Ribeye
      • Light Olive oil: or avocado oil, or your favorite oil.
      • Low-sodium soy sauce: you can also use coconut aminos or gluten-free soy sauce if you have an allergy or intolerance to gluten.
      • Lime juice: or lemon juice.
      • Orange juice: freshly squeezed is best, but you can use bottled in a pinch.
      • Red wine vinegar: or your favorite vinegar.
      • Onion and garlic: both finely minced. Use your favorite onion.
      • Cilantro: is not a must, but highly recommended.
      • Spices: red pepper flakes and smoked paprika
      • Salt and pepper

      How to Make the Best Carne Asada Marinade:

      1. Combine all the marinade ingredients in a bowl or zipper bag, and mix to combine.

      2. Pour the marinade over the steak, cover with plastic wrap, and refrigerate for 4 hours to overnight. You can also use a zipper bag.

      3. Preheat the grill or grill pan and cook the steak for 3-4 minutes on each side or until cooked to your liking!

      Tips to Make the Best Carne Asada Marinade:

      • Mince the onion, garlic, and cilantro as finely as you can so their flavor can permeate the meat.
      • For better flavor, let the meat marinade overnight in a zipper bag.
      • The marinade will tenderize the meat, and it will cook fast, so mind the cooking time.
      • This marinade doesn't have sugar or honey. I have found that it can caramelize too quickly and burn on the steak's surface.
      • Use Carne Asada to make tacos and serve them over blue corn tortillas and with Chirmol (Guatemalan salsa with mint) and your favorite taco add-ons.

      Carne Asada Marinade

      Infuse your Carne Asada with wonderful flavors like orange, lime, cilantro, garlic, onion, soy sauce, and spices for the best barbecue experience!
      Print Rate
      Course: Main Course
      Cuisine: Latin American
      Keyword: beef marinade, Carne Asada, Carne Asada marinade, carne asada tacos, grilled flank steak
      Prep Time: 20 minutes minutes
      Cook Time: 10 minutes minutes
      Marinating time: 4 hours hours
      Total Time: 4 hours hours 30 minutes minutes
      Calories: 380kcal

      Equipment

      • mixing bowl
      • grill or grill pan
      • measuring cups and spoons

      Ingredients

      • ¼ cup lite olive oil
      • ¼ cup low-sodium soy sauce
      • 1 lime juiced
      • 3 tablespoon orange juice freshly squeezed if possible
      • 2 tbsp red wine vinegar
      • ⅓ cup onion finely minced
      • 4 cloves garlic finely minced
      • 2 teaspoon salt
      • 2 teaspoon smoked paprika
      • 1 teaspoon red pepper flakes
      • freshly ground black pepper to taste
      • 3 lb skirt steak

      Instructions

      • Combine all ingredients except the meat in a bowl or zipper bag and mix to combine.
      • Pour the marinade over the steak (you can use a zipper bag), cover with plastic wrap and refrigerate for 4 hours to overnight.
      • Preheat the grill or grill pan and cook the steak for 3-4 minutes on each side or until cooked to your liking!

      Nutrition

      Calories: 380kcal | Carbohydrates: 3g | Protein: 31g | Fat: 25g | Saturated Fat: 8g | Polyunsaturated Fat: 1g | Monounsaturated Fat: 5g | Trans Fat: 2g | Cholesterol: 98mg | Sodium: 951mg | Potassium: 513mg | Fiber: 0.5g | Sugar: 1g

      Easy Horchata Recipe

      May 29, 2025 · Leave a Comment

      Easy Horchata Recipe

      To most Latin Americans, Horchata is reminiscent of childhood, of good times, and family gatherings. This refreshing rice beverage infused with cinnamon is a hit at any get-together. Perfect for summer barbecues, this Easy Horchata Recipe is not only nourishing but a crowd-pleaser as well!

      Ingredients for an Easy Horchata Recipe:

      • Rice: any rice is good for making horchata. Just make sure to wash it before using.
      • Milk: you can use whole milk, skim milk, or your favorite plant-based milk. I like using whole milk.
      • Sugar: granulated sugar is commonly used, but I have made it with monk fruit sweetener for a lower-calorie drink.
      • Cinnamon: You can use whole cinnamon sticks or ground cinnamon.
      • Water and ice

      How to Make Easy Horchata:

      1. Wash the rice and place it in a bowl. Cover with water (water lever should be an inch above the rice), and soak for at least 2 hours to overnight.

      2. Drain the soaking water and place the rice in the blender along with 2 cups of water and one cinnamon stick. Blend until well combined. Strain the mixture into a large measuring cup or pitcher.

      3. Pour the strained mixture into a pitcher and mix in the sugar, milk, and remaining two cups of water. Stir until the sugar dissolves.

      4. Add ice, give it a good swirl, and serve cold!

      Tips for Making the Best Easy Horchata:

      • The more you soak the rice, the more concentrated will be your horchata, so let it soak for as long as you can.
      • Serve ice cold with a sprinkling of ground cinnamon on top.
      • For a twist, add a teaspoon of vanilla extract, almond extract, or even a dash of espresso!
      • Make a large batch and take horchata to the kids' games, barbecue get-togethers, or family gatherings. It'll be gone in no-time!

      Easy Horchata Recipe

      Perfect for summer barbecues or family gatherings, refreshing Horchata is a creamy and sweet rice-based beverage with a touch of cinnamon.
      Print Pin Rate
      Course: Drinks
      Cuisine: Latin American
      Keyword: Easy Horchata Recipe, horchata, refreshing, Rice drink, sweetened rice drink
      Prep Time: 5 minutes minutes
      Soaking time: 2 hours hours
      Total Time: 2 hours hours 5 minutes minutes
      Servings: 6
      Calories: 175kcal

      Equipment

      • blender
      • Pitcher

      Ingredients

      • 1 cup long-grain white rice washed
      • 1 stick cinnamon
      • 4 cups water
      • ⅓ cup granulated sugar
      • 1 cup whole milk or milk of your choice
      • ice and ground cinnamon for serving

      Instructions

      • Wash the rice and place it in a bowl. Cover with water (water lever should be an inch above the rice), and soak for at least 2 hours to overnight.
      • Drain the soaking water and place the rice in the blender along with 2 cups of water and one cinnamon stick. Blend until well combined. Strain the mixture into a large measuring cup or pitcher.
      • Pour the strained mixture into a pitcher and mix in the sugar, milk, and remaining two cups of water. Stir until the sugar dissolves. Add ice and serve cold!

      Nutrition

      Calories: 175kcal | Carbohydrates: 36g | Protein: 2g | Fat: 1g | Saturated Fat: 1g | Monounsaturated Fat: 0.3g | Cholesterol: 5mg | Sodium: 16mg | Potassium: 89mg | Sugar: 13g

      Pork Al Pastor Recipe

      May 28, 2025 · Leave a Comment

      Pork Al Pastor Recipe

      Surprise your family on Taco Tuesday with this amazing Pork Al Pastor recipe. You can easily make your favorite tacos at home, and it's easier than you think. Thin-sliced pork shoulder marinated in a tangy mixture of dried chiles, orange juice, and spices is baked until the edges are slightly charred to make the most mouth-watering taco meat!

      Save this recipe to make the best Tacos al Pastor!

      Ingredients for Pork Al Pastor:

      • Pork shoulder: or pork butt. Ask your butcher to slice it thinly (¼-inch thick)
      • Orange juice: some people use pineapple juice, but I prefer orange juice.
      • Vinegar: you can use either white or apple cider vinegar.
      • Guajillo chiles: you can find them at most major grocery stores
      • Onion and garlic: use any type of onion you have on hand.
      • Herbs and spices: cumin seeds (or ground cumin), dried oregano, bay leaf, cloves, cinnamon, all spice, annatto paste, black peppercorns.
      • Pineapple: choose one that is not too ripe.

      How to Make the Best Pork al Pastor Recipe:

      1. Remove the seeds from the guajillo chiles and soak them in hot water for 10 minutes

      2. Blend the chiles, orange juice, vinegar, spices, onion, garlic, and salt until smooth.

      3. Slather the marinade all over the sliced pork making sure you cover all the meat, place it in an airtight container and refrigerate for 2-8 hours. Discard the excess marinade.

      4. Cut the bottom of the pineapple and skewer it into an Al Pastor Skewer Stand (you can use three wooden skewers instead).

      5. Skewer the slices pork one slice at a time until all slices are in place. Finish with a thick slice of pineapple. Slow roast in a 280 F oven for 2 ½ to 3 hours. Then, turn on the broiler and let the meat char on the edges for about 5 minutes. Keep an eye on it because it can burn easily!

      Tips to Make the Best Pork al Pastor Recipe:

      • The longer you marinate the meat, the better it tastes, but don't marinate it for more than 8 hours.
      • Not all ovens are well calibrated, so start checking for doneness at the 2 ½ hour mark.
      • Discard the excess marinade. You can't use it on cooked meat if it came in contact with the raw pork.
      • To make tacos al pastor serve the meat over corn tortillas and top with chopped cilantro, chopped raw onion, salsa verde, and sliced cooked pineapple (from the top of the trompo).

      Pork Al Pastor Recipe

      Thinly sliced pork shoulder marinated in a tangy mixture of orange juice, vinegar, dried chiles, and spices makes the best taco meat!
      Print Pin Rate
      Course: Main Course
      Cuisine: Mexican
      Keyword: homemade tacos al pastor, Pork al Pastor, Tacos al pastor, Trompo al pastor
      Prep Time: 30 minutes minutes
      Cook Time: 3 hours hours
      Total Time: 3 hours hours 30 minutes minutes
      Servings: 8
      Calories: 306kcal

      Equipment

      • Al Pastor Skewer Stand
      • blender
      • oven

      Ingredients

      • 4 Guajillo chiles
      • 2 oranges only the juice (about ½ cup)
      • ⅓ cup apple cider vinegar
      • 1 tablespoon annatto (achiote) paste
      • 4 cloves garlic
      • ¼ medium onion
      • 1 teaspoon cumin seeds or ground cumin
      • 1 teaspoon dried oregano
      • 2 bay leaves
      • ½ tsp cinnamon
      • ½ teaspoon all spice
      • 1 tablespoon salt
      • 5 black peppercorns or crushed black pepper to taste
      • 3 lb pork shoulder sliced ¼-inch thin
      • 1 pineapple

      Instructions

      • Remove the seeds from the guajillo chiles and soak them in hot water for 10 minutes
      • Blend the chiles, orange juice, vinegar, spices, onion, garlic, and salt until smooth.
      • Slather the marinade all over the sliced pork making sure you cover all the meat, place it in an airtight container and refrigerate for 2-8 hours. Discard the excess marinade.
      • Cut the bottom of the pineapple and skewer it into an Al Pastor Skewer Stand (you can use three wooden skewers instead).
      • Skewer the slices pork one slice at a time until all slices are in place. Finish with a thick slice of pineapple. Slow roast in a 280 F oven for 2 ½ to 3 hours. Then, turn on the broiler and let the meat char on the edges for about 5 minutes. Keep an eye on it because it can burn easily!

      Nutrition

      Calories: 306kcal | Carbohydrates: 4g | Protein: 28g | Fat: 18g | Saturated Fat: 7g | Cholesterol: 90mg | Sodium: 1329mg | Potassium: 69mg | Fiber: 0.5g | Sugar: 2g

      Gallo Pinto (Rice & Beans)

      May 28, 2025 · Leave a Comment

      Gallo Pinto is a Rice and Beans dish popular in Costa Rica and Nicaragua. It's served as a side dish for breakfast, lunch, or dinner almost every day. Made with an aromatic mixture of sautéed onions, garlic, bell peppers and ground cumin, this dish is worth all the hype!

      Ingredients for Gallo Pinto

      • Cooked black beans: You can used canned black beans, but it's easy to make them yourself in the slow cooker if you value eating unprocessed food.
      • Rice: long-grain white rice is my choice, but you can make this dish with Basmati as well.
      • Red Bell Pepper: gives a pop of color, but use the color you have on hand.
      • Onion and garlic: use white, yellow, or sweet onions.
      • Cilantro: can be omitted if you don't like it.
      • Ground cumin: is essential to make an authentic Gallo Pinto.
      • Oil: I like using avocado or lite olive oil, but feel free to use your favorite oil.

      How to Make a Perfect Gallo Pinto (Rice & Beans):

      1. Heat 2 tablespoon oil in a medium-sized skillet or saucepan over medium heat, and sauté the onion and garlic until the onion is translucent, about 2 minutes. Add the bell peppers, salt, and cumin, and cook until soft, about 2 minutes. Transfer to a plate.

      2. Add 2 more teaspoon of oil to the same pan and brown the rice for about 3 minutes, stirring constantly.

      3. Pour in the water, bring to a boil, reduce the heat and simmer until the rice is cooked. It will be moister than regular rice, this is ok.

      4. Mix in the sautéed veggies and black beans, lower the heat to low, and cook for 5 more minutes. Mix in the freshly chopped cilantro, adjust the seasoning with salt if needed, and serve!

      Tips to Make the Best Gallo Pinto (Rice & Beans):

      • Browning the rice is a crucial step that makes it fluffy and loose. Don't skip this step.
      • When mixing in the veggies and beans, check the seasoning and add more salt if needed.

      Gallo Pinto (Rice & Beans)

      An aromatic mixture of sautéed onions, garlic, bell peppers, and cumin make this rice-and-beans dish special and very popular!
      Print Pin Rate
      Course: Side Dish
      Cuisine: Latin
      Keyword: black beans side dish, gallo pinto, rice and beans, rice side dish, side dish
      Prep Time: 15 minutes minutes
      Cook Time: 20 minutes minutes
      Total Time: 35 minutes minutes
      Calories: 266kcal

      Equipment

      • medium-sized skillet or saucepan
      • knife and cutting board

      Ingredients

      • 4 teaspoon olive oil divided
      • ⅓ cup onion finely chopped
      • 2 cloves garlic minced
      • 1 medium red bell pepper chopped
      • 1 teaspoon ground cumin
      • 1 cup long-grain white rice washed and drained
      • 2 ½ cups water
      • 2 cups black beans cooked and drained
      • 1 teaspoon salt or to taste
      • chopped cilantro for serving

      Instructions

      • Heat 2 tablespoon oil in a medium-sized skillet or saucepan over medium heat, and sauté the onion and garlic until the onion is translucent, about 2 minutes. Add the bell peppers, salt, and cumin, and cook until soft, about 2 minutes. Transfer to a plate.
      • Add 2 more teaspoon of oil to the same pan and brown the rice for about 3 minutes, stirring constantly.
      • Pour in the water, bring to a boil, reduce the heat and simmer until the rice is cooked. It will be moister than regular rice, this is ok.
      • Mix in the sautéed veggies and black beans, lower the heat to low, and cook for 5 more minutes. Mix in the freshly chopped cilantro, adjust the seasoning with salt if needed, and serve!

      Nutrition

      Calories: 266kcal | Carbohydrates: 40g | Protein: 8g | Fat: 6g | Saturated Fat: 1g | Polyunsaturated Fat: 2g | Monounsaturated Fat: 4g | Sodium: 523mg | Potassium: 258mg | Fiber: 6g | Sugar: 1g

      Authentic Pozole Verde

      May 28, 2025 · Leave a Comment

      Pozole Verde

      One of Mexico's most iconic dish is Pozole Verde. Pork cubes and hominy are cooked in a tangy and slightly spicy salsa verde and served with crackling pork rinds, shredded lettuce, sliced radishes, and avocado. Don't be discouraged by the long ingredient list. Authentic Pozole Verde is very easy to make and a feast to the eyes and the senses!

      Ingredients and substitutions for Authentic Pozole Verde

      • Green Tomatillos: there is no substitute for tomatillos verdes. They essential for making the salsa verde.
      • Poblano pepper: You can use green bell pepper if you can't find. The flavor will change slightly though.
      • Serrano chilis: You can substitute them with jalapeños but make sure you remove the seeds if you don't like too much heat.
      • Fresh cilantro and parsley: these herbs are also essential. If you need to use just one, I would pick cilantro.
      • Epazote: You can find it in Mexican grocery stores, but you can omit it if you can't find it. It's recommended but not essential.
      • White Onion and garlic: use your favorite onion.
      • Herbs: Oregano, bay leaf, and thyme are classic herbs used in Latin cuisine. Use all of them or the ones you have on hand.
      • Oil: Use your favorite oil.
      • Hominy: or Maiz Pozolero is essential. You can find it canned, in most grocery stores.
      • Pork Shoulder: or pork butt. I have even used pork loin, although this cut is less juicy.
      • Chicken Broth: to make the sauce. You can use water instead.

      How to Make Easy Pozole Verde

      1. Place the green tomatillos, poblano pepper, and Serrano peppers in a medium-sized pot. Fill with water and cook over medium heat until the tomatillos change from a bright green to an olive green color, about 8-10 minutes.

      2. While the tomatillos are cooking, heat 2 tablespoon oil in a large pot over medium-high heat and brown the pork pieces on all sides (they don't have to be fully cooked). Season with salt and pepper.

      3. Place the cooked tomatillos and peppers into the blender along with the onion, garlic, cilantro, parsley and epazote. Add about 1 cup of the cooking water and blend until smooth.

      4. Heat 2 more tablespoon of oil in the same pot used to brown the pork, and pour in the sauce. Add the oregano, bay leaf, thyme, one teaspoon salt, pepper, and chicken broth (or water). Bring to a boil, reduce the heat and simmer for 10 minutes.

      5. Transfer the browned pork to the pot, bring to a boil, reduce the heat, and cook for 30-40 minutes or until the pork is soft and fork-tender.

      6. Add the drained hominy and cook for an additional 5-8 minute or until warmed through. Check the seasoning and add more salt if needed.

      Tips to Make the Best Authentic Pozole Verde:

      • Serve with sliced fresh radishes, avocado, shredded lettuce, freshly chopped onion, pork rinds, Mexican crema, and fresh cilantro. A feast!
      • Browning the pork instead of just boiling it in the sauce elevates the flavor of the pozole. Don't skip this step.
      • If you don't like spicy food, make sure to remove all the seeds in the peppers.

      Authentic Pozole Verde

      Fork tender pork and hearty hominy are bathed in a tangy, slightly spicy salsa verde and topped with fresh veggies and crispy pork rinds for a Mexican feast!
      Print Pin Rate
      Course: Main Course
      Cuisine: Mexican
      Keyword: authentic green pozole, authentic pozole verde, easy pozole verde, Mexican pozole, pozole verde
      Prep Time: 15 minutes minutes
      Cook Time: 1 hour hour 15 minutes minutes
      Total Time: 1 hour hour 30 minutes minutes
      Servings: 8
      Calories: 325kcal

      Equipment

      • blender
      • medium pot
      • large pot
      • stovetop

      Ingredients

      For the Salsa Verde

      • 8 green Tomatillos
      • 2 serrano peppers
      • 1 poblano pepper
      • ½ cup cilantro leaves
      • ½ cup parsley leaves
      • 4 epazote leaves
      • ½ white onion
      • 6 garlic cloves
      • 4 tablespoon lite olive oil divided
      • ½ teaspoon dry oregano leaves
      • ½ teaspoon dry thyme
      • 1 bay leaf
      • 4 cups chicken broth or water

      For the Pozole

      • 2 lb pork shoulder cut into large cubes
      • 2 cups hominy drained

      For serving

      • sliced radishes
      • shredded lettuce
      • pork rinds
      • fresh onion (chopped)
      • Mexican crema (or sour cream)

      Instructions

      • Place the green tomatillos, poblano pepper, and serrano chilis in a medium-sized pot. Fill with water and cook over medium heat until the tomatillos change from a bright green to an olive green color, about 8-10 minutes. Transfer to a plate.
      • While the tomatillos are cooking, heat 2 tablespoon oil in a large pot over medium-high heat and brown the pork pieces on all sides (they don't have to be fully cooked). Season with salt and pepper.
      • Place the cooked tomatillos and chilies into the blender along with the onion, garlic, cilantro, parsley and epazote. Add about 1 cup of the cooking water and blend until smooth.
      • Heat 2 more tablespoon of oil in the same pot used to brown the pork, and pour in the sauce. Add the oregano, bay leaf, thyme, one teaspoon salt (or to taste), and pepper, and chicken broth (or water). Bring to a boil, reduce the heat and simmer for 10 minutes.
      • Transfer the browned pork to the pot, bring to a boil, reduce the heat, and cook for 30-40 minutes or until the pork is soft and fork-tender.
      • Add the drained hominy and cook for an additional 5-8 minute or until warmed through. Check the seasoning and add more salt if needed.

      Nutrition

      Calories: 325kcal | Carbohydrates: 12g | Protein: 22g | Fat: 20g | Saturated Fat: 6g | Polyunsaturated Fat: 1g | Monounsaturated Fat: 6g | Cholesterol: 60mg | Sodium: 1004mg | Potassium: 263mg | Fiber: 2g | Sugar: 3g

      Peruvian Ceviche with Tiger's Milk

      May 28, 2025 · Leave a Comment

      Peruvian Ceviche

      Peruvian ceviche with Tiger's Milk is one of the most famous Latin American ceviche recipes. Tiger's Milk is a mixture of lime juice, raw fish, ginger, red onion, and celery that's strained and used to marinate fresh raw fish. It's served with sweet potato, limo pepper (aji limo), red onion, choclo (large corn kernels), and cancha (toasted corn kernels).

      Ingredients for Peruvian Ceviche with Tiger's Milk

      • Fresh white-fleshed fish: I used Sea Bass, but you can use Mahi Mahi, Striped bass, or Grouper. Any white-fleshed, semi-firm fish will do.
      • lime juice: is desired because of their high acidity, but you can use lemon juice too.
      • Celery: is used to make Tiger's Milk and it is highly recommended because it gives Tiger's Milk its characteristic flavor.
      • Ginger: also provides flavor for Tiger's Milk. It gives it punch and tang. If you don't have fresh ginger, add ¼ teaspoon dry ginger, although the flavor of the ceviche will change slightly.
      • Garlic: flavors Tiger's Milk, but you can omit it if you don't like garlic.
      • Ice cubes: it's recommended to keep all ingredients as cold as possible, so ice cubes are added to keep the Tiger's Milk fresh.
      • Aji Limo (Limo Pepper): also known as Lime Lemon Drop Peppers are native to Peru and widely used. They are medium-hot and you can use jalapeños if you can't find them.
      • Red Onion: is a must for authentic Peruvian ceviche. It must be sliced very thinly.
      • Sweet Potato: the sweetness from sweet potato helps cleanse the palate from the spicy pepper and tangy lemon. It balances the dish perfectly. It is desired to use the sweetest most vibrant-colored sweet potatoes, but any type will do.
      • Choclo: is a type of corn native to Peru. They are large, meaty corn kernels, and you can find them at most Latin grocery stores. You can use regular corn kernels in a pinch.
      • Cilantro: is used as a topping and can be omitted if you don't have it.

      How to Make Peruvian Ceviche with Tiger's Milk

      1. Make the Tiger's Milk: place the lime juice, ¼ cup cubed fish, celery, ¼ cup sliced red onion, garlic, ginger, and 2-3 ice cubes in a blender and blend util smooth. Strain the mixture and discard the solids.

      2. Pour the Tiger's Milk over the fish and mix until well combined. Stir in the chopped cilantro and sliced Aji limo. Season with salt.

      3. Serve immediately with thinly sliced red onion on top and alongside sliced, cooked sweet potato and choclo.

      Tips to Make the Best Peruvian Ceviche with Tiger's Milk:

      • Adding ice to the blender when making Tiger's Milk is important. We want to keep the raw fish as fresh as possible.
      • Slice the red onion as thinly as possible and use the sweetest sweet potatoes you can find.
      • Peruvian ceviche is served immediately contrary to other ceviche recipes which are marinated in the lime juice. If you don't like raw fish, you can leave the fish in the lime juice for 20 mins before serving.

      Peruvian Ceviche with Tiger's Milk

      Leche de Tigre (a mixture of lime juice, celery, ginger, red onion, garlic, and fresh fish) is the perfect marinade for the most authentic Peruvian Ceviche!
      Print Pin Rate
      Course: Main Course, Salad
      Cuisine: Peruvian
      Keyword: ceviche, Leche de Tigre, Peruvian ceviche, Tiger's Milk
      Prep Time: 20 minutes minutes
      Total Time: 20 minutes minutes
      Servings: 4
      Calories: 232kcal

      Equipment

      • blender
      • knife and cutting board

      Ingredients

      • 2 cups lime juice
      • 1 stalk celery cut into pieces
      • ½ cut red onion thinly sliced and divided
      • 1 garlic clove
      • ½ inch fresh ginger
      • 1 lb Sea Bass cut into ½-inch cubes and divided
      • ½ limo pepper (aji limo) thinly sliced
      • 2 tablespoon cilantro leaves

      For Serving:

      • 1 sweet potato boiled and sliced
      • 1 cup choclo cooked

      Instructions

      • Make the Tiger's Milk: place the lime juice, ¼ cup cubed fish, celery, ¼ cup sliced red onion, garlic, ginger, and 2-3 ice cubes in a blender and blend util smooth. Strain the mixture and discard the solids.
      • Pour the Tiger's Milk over the fish and mix until well combined. Stir in the chopped cilantro and sliced Aji limo. Season with salt.
      • Serve immediately with thinly sliced red onion on top and alongside sliced, cooked sweet potato and choclo.

      Nutrition

      Calories: 232kcal | Carbohydrates: 29g | Protein: 11g | Fat: 10g | Saturated Fat: 2g | Cholesterol: 33mg | Sodium: 106mg | Potassium: 385mg | Fiber: 2g | Sugar: 5g

      Beef and Vegetable Soup

      May 28, 2025 · Leave a Comment

      Beef and Vegetable Soup

      All over Latin America people enjoy Beef and Vegetable Soup as part of their culture. It's nourishing and comforting. The veggies of choice might change, but the soul of this dish is the same. Beef is slow-boiled until fork tender, and then veggies are added to the resulting broth to make a complete meal that is sometimes served with a side of white rice, lime wedges, and a few droplets of hot sauce.

      Ingredients for Beef and Vegetable Soup:

      • Chuck roast, chuck shoulder, top chuck, are all great for making a slow cooked soup. If you want to spend on a more pricier but more tender cut, use brisket.
      • Soup Bones are not essential but are recommended. They give amazing flavor to the soup.
      • Onion and garlic are used to flavor the broth.
      • Vegetables of choice: I have used tomatoes, chayote squash, corn on the cob, potatoes, carrots, and cabbage. Usually pumpkin is also used. You can use your favorite veggies.
      • Bay leaves provide flavor and aroma to the broth.
      • Cilantro: also flavors the broth and is used as a fresh topping.
      • Avocado, lime wedges, and hot sauce for serving.

      How to Make Beef and Vegetable Soup:

      1. Place the meat and bones in a large pot and fill with water. Add the onion, garlic, salt, and pepper, and bring to a boil. Reduce the heat, and simmer for 1 ½ hours, covered. Skim the foam from the top of the pot every few minutes until no more is produced.

      2. Remove the onion, garlic, and bones and discard.

      3. Add the carrots, corn on the cob, chopped cabbage, and cilantro, and simmer until firm but almost cooked.

      4. Mix in the potatoes and chayote and simmer until tender. Adjust the seasoning and add salt and pepper if needed.

      Tips for the Best Beef and Vegetable Soup:

      • Serve with lime wedges, cooked rice, sliced avocado, and hot sauce on the side.
      • Use the veggies you have on hand. This is a great recipe for a fridge haul!
      • Using soup bones makes a huge difference flavor wise. They are not essential but I do recommend using them.
      • Always check the seasoning at the end of the cooking time and adjust the amount of salt to your liking.

      Beef and Vegetable Soup

      Hearty and nutritious beef and vegetables are is slow cooked until complex flavors develop and meld together for the most comforting soup!
      Print Pin Rate
      Course: Soup
      Cuisine: Latin
      Keyword: beef and vegetable soup, beef soup, cocido de res
      Prep Time: 15 minutes minutes
      Cook Time: 2 hours hours
      Total Time: 2 hours hours 15 minutes minutes
      Calories: 372kcal

      Equipment

      • knife and cutting board
      • large soup pot

      Ingredients

      • 2 lb chuck roast cut into chunks
      • 2 soup bones
      • ½ yellow onion cut into fourths
      • 2 garlic cloves
      • 2 corn ears cut into 4 pieces each
      • 3 Roma tomatoes chopped
      • 3 large carrots cut into 1-inch slices
      • ½ small cabbage chopped
      • 1 chayote squash cut into 1-inch squares
      • 3 Yukon gold potatoes cut into 1-inch squares
      • ¼ cilantro bunch
      • 2 teaspoon salt or to taste
      • 2 bay leaves

      For serving:

      • avocado
      • cooked rice
      • lime wedges
      • hot sauce

      Instructions

      • Place the meat and bones in a large pot and fill with water. Add the onion, garlic, salt, and pepper, and bring to a boil. Reduce the heat, and simmer for 1 ½ hours, covered. Skim the foam from the top of the pot every few minutes until no more is produced.
      • Remove the onion, garlic, and bones and discard.
      • Add the carrots, corn on the cob, chopped tomatoes ,chopped cabbage, and cilantro, and simmer until firm but almost cooked.
      • Mix in the potatoes and chayote and simmer until tender. Adjust the seasoning and add salt and pepper if needed.
      • Serve with lime wedges, cooked rice, sliced avocado, and hot sauce

      Nutrition

      Calories: 372kcal | Carbohydrates: 23g | Protein: 30g | Fat: 18g | Saturated Fat: 7g | Polyunsaturated Fat: 1g | Monounsaturated Fat: 8g | Trans Fat: 1g | Cholesterol: 94mg | Sodium: 692mg | Potassium: 555mg | Fiber: 4g | Sugar: 5g

      Chicken in Cream Sauce with Loroco

      May 28, 2025 · Leave a Comment

      Chicken Cream with Loroco

      Loroco is an edible flower bud used in many Central American recipes from salads to pupusas, tamales, eggs, and chicken dishes. You can find it frozen en many Latin American grocery stores. Its strong and characteristic flavor is somewhat sweet and tangy at the same time, and in this case, it is the star of the recipe. Take a chance and try Chicken in Cream Sauce with Loroco!

      Ingredients for Chicken in Loroco Cream Sauce

      • Chicken: I used boneless, skinless chicken breasts, but you can use bone-in breasts, thighs, or your favorite cut.
      • Oil: lite olive oil, avocado oil, or your oil of choice.
      • Bell Pepper: you can use any color bell pepper you have on hand. For aesthetic purposes I used orange bell pepper because I the tomatoes are red and the loroco is green.
      • Roma tomatoes: use any type of tomatoes you have on hand. You can use beef tomatoes or grape tomatoes.
      • Onion and garlic: the essential duo in Latin American cooking!
      • Loroco: is the star of the dish. If you don't use it, the dish will still be delicious, but it adds a very characteristic flavor to the dish.
      • Mexican crema or heavy cream brings lushness and creaminess to the dish. For fewer calories, you can use half and half, but the sauce will be thinner.
      • Cilantro provides flavor to the sauce, but it is not an essential ingredient. You can omit it if you don't like it.

      How to Make Chicken in Cream Sauce with Loroco

      1. Place the chicken breasts in a large pot along with cilantro, garlic, and half of the onion. Add salt, pepper corns, and enough water to cover the chicken.

      2. Bring to a boil over medium-high heat and cook until the chicken is fully cooked, about 10 minutes. Reserve 1 cup of the cooking water (chicken stock).

      3. Heat 2 teaspoon oil in the same pot, over medium heat, and sauté the onions and bell peppers until soft, about 3 minutes.

      4. Add the chopped tomatoes and cook for an additional 3 minutes.

      5. Pour in the reserved chicken stock, heavy cream, and return the cooked chicken to the pot. Simmer for 20 minutes but don't let the sauce boil.

      6. Mix in the loroco flowers and simmer for 5 more minutes. Adjust the seasoning and add more salt if needed. Serve over freshly cooked white rice.

      Tips for the Best Chicken in Cream Sauce with Loroco

      • If you want a thicker sauce, mix in a slurry of 2 tablespoon of water and 1 tablespoon of cornstarch when adding the chicken stock.
      • Don't let the sauce boil after adding the heavy cream or it might curdle. Just a gentle simmer.
      • Always check the seasoning at the end so you can add salt if needed.

      Chicken in Cream Sauce with Loroco

      Chicken in Cream Sauce gets a makeover when you add in Loroco flowers. Their unique flavor is characteristic of Central American cuisine.
      Print Pin Rate
      Course: Main Course
      Cuisine: Central American, Guatemalan
      Keyword: chicken with cream sauce, chicken with cream sauce and loroco, pollo en crema y loroco, salsa de crema y loroco
      Prep Time: 10 minutes minutes
      Cook Time: 40 minutes minutes
      Total Time: 50 minutes minutes
      Servings: 4
      Calories: 398kcal

      Equipment

      • large pot
      • knife and cutting board
      • stovetop

      Ingredients

      • 2 large chicken breasts, boneless and skinless
      • ½ yellow onion divided (¼ of the onion, sliced)
      • 2 garlic cloves
      • ¼ cilantro bunch
      • 2 teaspoon salt or to taste, divided
      • 4 peppercorns
      • 1 orange bell pepper chopped
      • 3 Roma tomatoes chopped
      • 1 cup Latin table cream or heavy cream
      • ½ cup loroco flowers (thawed if frozen)

      Instructions

      • Place the chicken breasts in a large pot along with cilantro, garlic, and half of the onion. Add salt, pepper corns, and enough water to cover the chicken.
      • Bring to a boil over medium-high heat and cook until the chicken is fully cooked, about 10 minutes. Reserve 1 cup of the cooking water (chicken stock).
      • Heat 2 teaspoon oil in the same pot, over medium heat, and sauté the remaining half of the onions (¼ onion, sliced) and bell peppers until soft, about 3 minutes.
      • Add the chopped tomatoes and cook for an additional 3 minutes.
      • Pour in the reserved chicken stock, heavy cream, and return the cooked chicken to the pot. Simmer for 20 minutes.
      • Mix in the loroco flowers and simmer for 5 more minutes. Adjust the seasoning adding more salt if needed. Serve over freshly cooked white rice.

      Nutrition

      Calories: 398kcal | Carbohydrates: 12g | Protein: 34g | Fat: 25g | Saturated Fat: 15g | Polyunsaturated Fat: 2g | Monounsaturated Fat: 7g | Cholesterol: 150mg | Sodium: 1574mg | Potassium: 542mg | Fiber: 2g | Sugar: 6g

      Beef Milanesa

      May 28, 2025 · Leave a Comment

      Beef Milanesa

      Beef Milanesa is a very popular way to eat steak in many Latin American countries. It's usually made from an inexpensive cut of beef that is pounded thin and breaded before being pan-fried to crispy perfection. You can serve it alongside French fries, rice, or as a filling for a hearty sandwich.

      Ingredients and Substitutions for Beef Milanesa :

      1. Flank Steak: is already a thin cut, but you can use top round steak or ribeye. Ask the butcher to slice it thin.
      2. Flour: all purpose flour makes the breading stick to the steak better.
      3. Eggs: are the binding agent between the steak and the breading. If you don't want to use eggs, dip the steak in a slurry of flour and water before breading.
      4. Panko Breadcrumbs: produce the crispier, crunchier Milanesa, but you can use regular breadcrumbs or even crushed crackers.
      5. Salt and pepper are super important because they are the only seasonings for Milanesa. You can also add dried parsley or other herbs to the breadcrumbs if you want to enhance the flavor.
      6. Oil: I like using lite olive oil or avocado oil, but you can use the oil of your choice.

      How to Make Crispy and Tender Milanesa:

      1. Place the steaks between two sheets of parchment paper and pound them to about ¼-inch thick. Season generously with salt and pepper.

      2. Dip the seasoned steaks into flour and shake to remove any excess.

      3. Beat the eggs in a shallow bowl and place the Panko breadcrumbs in a second shallow bowl.

      4. Dip the floured steaks into the egg, shaking off any excess.

      5. and then place them into the bowl with the breadcrumbs. Press the steaks into the breadcrumbs on both sides so they are fully covered and well breaded. Set aside.

      6. Heat the oil in a large skillet over medium-high heat and cook one or two steaks (depending on the size), for 3-4 minutes on each side until crispy and golden brown. The steaks should cook fully if pounded thin.

      Tips for the Best Beef Milanesa:

      • Serve Milanesa with a side of French fries, rice, or your favorite pasta. You can also use it as filling for a very hearty sandwich!
      • Pound the steaks as thin as you can so they cook quickly and evenly.
      • For extra flavor, add herbs and spices to the breadcrumbs.
      • Reheat in the toaster oven for a crispy Milanesa.

      Beef Milanesa

      Perfectly crispy on the outside, tender and juicy on the inside, Beef Milanesa will be your next obsession!
      Print Pin Rate
      Course: Main Course
      Cuisine: Latin
      Keyword: beef country fired steak, beef milanesa, crispy breading, crispy milanesa
      Prep Time: 20 minutes minutes
      Cook Time: 10 minutes minutes
      Total Time: 30 minutes minutes
      Servings: 2
      Calories: 623kcal

      Equipment

      • meat mallet
      • shallow bowls
      • large skillet

      Ingredients

      • 1 ½ lb flank steak cut into 4 steaks
      • 2 tsp salt or to taste
      • freshly cracked black pepper to taste
      • ⅓ cup all-purpose flour
      • 2 large eggs beaten
      • 2 cups Panko breadcrumbs
      • ⅓ cup lite olive oil or enough to pan fry the steaks

      Instructions

      • Place the steaks between two sheets of parchment paper and pound them to about ¼-inch thick. Season generously with salt and pepper.
      • Dip the seasoned steaks into flour and shake to remove any excess.
      • Beat the eggs in a shallow bowl and place the Panko breadcrumbs in a second shallow bowl.
      • Dip the floured steaks into the egg, shaking off any excess, and then place them into the bowl with the breadcrumbs. Press the steaks into the breadcrumbs on both sides so they are fully covered and well breaded. Set aside.
      • Heat the oil in a large skillet over medium-high heat and cook one or two steaks (depending on the size), for 3-4 minutes on each side until crispy and golden brown. The steaks should cook fully if pounded thin. Continue with the rest of the steaks. Add more oil to the skillet if needed.

      Nutrition

      Calories: 623kcal | Carbohydrates: 27g | Protein: 43g | Fat: 35g | Saturated Fat: 10g | Polyunsaturated Fat: 2g | Monounsaturated Fat: 15g | Cholesterol: 112mg | Sodium: 1376mg | Potassium: 12mg | Fiber: 0.25g

      Easy 5-Ingredient Flan Recipe

      May 28, 2025 · Leave a Comment

      Easy Flan recipe

      It always amazes me how such simple ingredients like eggs, milk, sugar, and condensed milk can make such a delicious dessert. Flan looks like a complicated and hard to accomplish sweet, but in reality it is very simple to make. Follow this Easy 5-ingredient flan recipe and be amazed yourself!

      Ingredients for Easy Flan Recipe:

      • Eggs: Give flan its characteristic custard consistency and I haven't found any substitutions for them.
      • Milk: I used whole milk, but you can use semi skim, skim, or plant-based milk.
      • Condensed Milk: provides sweetness and texture. I haven't tried, but if you have a lactose intolerance, you could try using condensed coconut milk.
      • Sugar: Is used to make the caramel on which the custard is cooked on. I haven't used a substitute for sugar.
      • Vanilla extract: gives flan a vanilla essence flavor that can be substituted with a couple of teaspoons of instant coffee or other extracts like almond, for a twist. Lemon zest can also be used instead of vanilla extract.

      How to Make Easy 5-Ingredient Flan:

      1. Make the caramel: heat a medium-sized skillet over medium heat and pour the sugar in. Stir constantly until the sugar dissolves and turns into an amber-colored liquid caramel.

      2. Carefully pour it into a 7-inch cake pan and swirl it around until it completely covers the bottom of the pan. You need to work fast because it will get hard fairly quickly. Be very careful, caramel can really extremely hot. Use oven mitts if possible! Set aside to cool.

      3. Make the custard: place the eggs, condensed milk, whole milk, and vanilla extract in a medium-sized bowl and whisk until well combined. Don't whisk too vigorously as not to produce many bubbles.

      4. Strain the custard mixture through a fine mesh sieve to remove any egg solids, and pour the custard mixture into the pan with the cooled caramel. Cover tightly with foil.

      5. Place the pan into a larger baking dish and fill the baking dish with water until it reaches about halfway up the flan pan.

      1. Bake at 350 F for one hour and 15 minutes. Remove the pan from the baking dish, take off the foil, and let cool to room temperature. Chill for at least 4 hours in the fridge before serving.

      Tips for the Best Easy 5-Ingredient Flan Recipe:

      • Make sure the caramel coats the entire bottom of the pan, but be very careful it can get really hot!
      • Staining the custard is very important for a smooth flan, so don't skip this step.
      • Serve flan after chilling it for at least 4 hours until set and cold.
      • When finished baking, the flan will be a little jiggly, this is ok. It will settle in the fridge.
      • Always check that your oven is well calibrated so you bake your flan at the intended temperature.
      • Slice using a sharp knife and spoon some of the caramel on top!

      Easy 5-Ingredient Flan Recipe

      This 5-ingredient Easy Flan recipe takes about 20 minutes to prepare, needs no mixer, and comes out perfectly every time!
      Print Pin Rate
      Course: Dessert
      Cuisine: Latin
      Keyword: 5 ingredients, easy flan recipe, no-mixer needed, perfect every time
      Prep Time: 20 minutes minutes
      Cook Time: 1 hour hour 15 minutes minutes
      Chilling time: 4 hours hours
      Total Time: 5 hours hours 35 minutes minutes
      Servings: 8
      Calories: 296kcal

      Equipment

      • 1 7-inch round pan
      • 1 large baking dish
      • 1 medium-sized bowl
      • 1 medium-sized skillet
      • oven and stovetop
      • whisk

      Ingredients

      • ¾ cup granulated sugar
      • 1 14-oz can sweetened condensed milk
      • 4 large eggs
      • 1 ¼ cup whole milk (or the milk of your choice)
      • 2 teaspoon vanilla extract

      Instructions

      • Make the caramel: heat a medium-sized skillet over medium heat and pour the sugar in. Stir constantly until the sugar dissolves and turns into an amber-colored liquid caramel.
      • Carefully pour it into a 7-inch cake pan and swirl it around until it completely covers the bottom of the pan. You need to work fast because it will get hard fairly quickly. Be very careful, caramel can really extremely hot. Use oven mitts if possible! Set aside to cool.
      • Make the custard: place the eggs, condensed milk, whole milk, and vanilla extract in a medium-sized bowl and whisk until well combined. Don't whisk too vigorously as not to produce many bubbles.
      • Strain the custard mixture through a fine mesh sieve to remove any egg solids, and pour the custard mixture into the pan with the cooled caramel. Cover tightly with foil.
      • Place the pan into a larger baking dish and fill the baking dish with water until it reaches about halfway up the flan pan.
      • Bake at 350 F for one hour and 15 minutes. Remove the pan from the baking dish, take off the foil, and let cool to room temperature. Chill for at least 4 hours in the fridge before serving.

      Notes

      • Try not to whisk too vigorously so not many bubbles are produced.
      • Tap the pan on the counter a few times after pouring the custard to remove the remaining bubbles.
      • Cover tightly with foil so the steamed produced in the oven doesn't come in contact with the surface of the custard.

      Nutrition

      Calories: 296kcal | Carbohydrates: 48g | Protein: 8g | Fat: 7.5g | Saturated Fat: 4g | Monounsaturated Fat: 0.25g | Cholesterol: 17mg | Sodium: 103mg | Potassium: 196mg | Sugar: 48g

      Guatemalan Chicken Pepian

      May 27, 2025 · Leave a Comment

      Chicken Pepian

      Normally Guatemalan Chicken Pepian is made with bone-in chicken pieces, but for ease I made it with boneless chicken breasts. The chicken is stewed in the most fragrant sauce made with dry chilies, green and red tomatoes, pumpkin and sesame seeds, and a mixture of aromatic spices that includes cinnamon and cloves.

      Ingredients and Substitutions:

      • Roma tomatoes and Green tomatillos: these are the base for the chicken stew sauce. If you can't find green tomatillos, use only red.
      • Onion: you can use any color onion you have on hand.
      • Guajillo and Pasilla chilies: you can find these chilis at most large grocery stores. Using both is desirable, but if you can only find one, it's ok.
      • Potatoes: I used Yukon Gold, but you can use any variety you have on hand.
      • Veggies: this stew normally includes green beans, carrots, and chayote squash.
      • Cilantro: fresh cilantro gives amazing flavor to the sauce and it is used as a garnish as well.
      • Pepita seeds and sesame seeds: these provide a nutty flavor to the stew. Pan-roasting them before using enhances their flavor.
      • Spices: ground cinnamon and cloves bring depth of flavor. If you don't have cloves, it's ok to use just cinnamon.
      • Instant corn masa flour: is used as a thickening agent, but you can use regular all-purpose flour instead.
      • Chicken broth: is used as the base for the sauce. I recommend using low-sodium.
      • Chicken: I used boneless, skinless chicken breasts, but the authentic recipe calls for bone-in chicken pieces. Use the ones you prefer.

      How to Make Guatemalan Chicken Pepian:

      1. Heat a griddle over high heat and slightly char the tomatoes, tomatillos, onion, and dry chilis. In a small skillet toast the pepita and sesame seeds until golden. Set aside.

      2. Remove the seeds from the roasted chilies and soak them in hot water for about 10 minutes. Transfer to the blender. Add the charred tomatoes and onion, cilantro, pepita and sesame seeds, cinnamon, cloves, salt, pepper, instant corn masa flour, chicken broth, and blend until smooth. Set aside.

      3. Bring a large pot of water to a boil and cook the green beans and carrots for 5 minutes. Add the potatoes and cook until the potatoes are firm-tender. Drain and set the cooked veggies aside.

      4. In the same pot, heat one tablespoon of oil over medium-high heat and brown the chicken pieces on all sides, about 4 minutes. Transfer to a plate.

      5. Heat one more tablespoon of oil in the same pot and cook the sauce for 2-3 minutes.

      6. Return the chicken to the pot as well as the veggies. Bring to a boil, reduce the heat, and simmer for 10 minutes until the chicken is cooked through.

      • Serve over freshly cooked rice and with cilantro leaves on top. Enjoy!

      Tips for the Best Chicken Pepian:

      • Charring the tomatoes helps develop the characteristic flavor of the sauce, but in a pinch you can omit this step.
      • But do lightly toast the seeds! This will give the sauce a nutty flavor.
      • Browning the chicken pieces also elevates the flavor of the stew, don't miss this step.

      Guatemalan Chicken Pepian

      Chicken pieces are stewed in the most fragrant sauce made with dry chilies, green and red tomatoes, pumpkin and sesame seeds, and a mixture of aromatic spices that includes cinnamon and cloves.
      Print Pin Rate
      Course: Main Course
      Cuisine: Latin
      Keyword: chicken stew, Guatemalan Chicken Stew, Guatemalan Pepian, latin cuisine, Pepian de Pollo
      Prep Time: 15 minutes minutes
      Cook Time: 45 minutes minutes
      Total Time: 1 hour hour
      Servings: 8
      Calories: 306kcal

      Equipment

      • 1 large pot
      • cutting boar
      • blender
      • griddle
      • sharp knife

      Ingredients

      For the sauce

      • 6 Roma tomatoes
      • 6 Green tomatillos
      • ½ white onion
      • 1 Chile pasilla
      • 2 Chile guajillo
      • ¼ cup cilantro leaves
      • 1 ½ tablespoon sesame seeds
      • 1 ½ tablespoon pepita seeds (pumpkin seeds)
      • ¼ teaspoon ground cinnamon
      • ⅛ tsp ground cloves
      • 1 tsp salt or to taste
      • freshly cracked black pepper to taste
      • 2 cups chicken broth low-sodium
      • 2 tablespoon instant corn masa flour (Maseca)
      • 1 tablespoon olive oil

      For the Chicken and Veggies

      • 4 large skinless, boneless chicken breasts cut into 1 ½-inch cubes
      • 3 carrots cut into 1-inch slices
      • 2 chayote squash cut into 1-inch pieces
      • 3 Yukon gold potatoes cut into 1-inch pieces
      • 1 cup green beans cut into 1-inch pieces
      • 1 tablespoon olive oil

      Instructions

      • Heat a griddle over high heat and slightly char the tomatoes, tomatillos, onion, and dry chilis. In a small skillet toast the pepita and sesame seeds until golden. Set aside.
      • Remove the seeds from the roasted chilies and soak them in hot water for about 10 minutes. Transfer to the blender. Add the charred tomatoes, onion, cilantro, pepita (pumpkin)and sesame seeds, cinnamon, cloves, salt, pepper, instant corn masa flour (maseca), and chicken broth, and blend until smooth. Set aside.
      • Bring a large pot of water to a boil and cook the green beans, and carrots for 5 minutes. Add the potatoes and chayote squash, and cook until the veggies are firm-tender. Drain and set the cooked veggies aside.
      • In the same pot, heat one tablespoon of oil over medium-high heat and brown the chicken pieces on all sides, about 4 minutes. Transfer to a plate.
      • Heat one more tablespoon of oil in the same pot and cook the sauce for 2-3 minutes.
      • Return the chicken to the pot as well as the veggies. Bring to a boil, reduce the heat, and simmer for 10 minutes until the chicken is cooked through. Check the seasoning and add more salt if needed.

      Notes

      • If you want a thicker or thinner stew, add more chicken broth, or let it simmer for a bit longer.
      • You can store this dish in the fridge for up to 4 days in an airtight container.
      • This dish can be frozen for up to 3 months in an airtight container.

      Nutrition

      Calories: 306kcal | Carbohydrates: 24g | Protein: 34g | Fat: 9g | Saturated Fat: 2g | Polyunsaturated Fat: 1g | Monounsaturated Fat: 2g | Cholesterol: 82mg | Sodium: 874mg | Potassium: 728mg | Fiber: 5g | Sugar: 7g

      Albondigas Soup (Sopa de Albondigas)

      May 26, 2025 · Leave a Comment

      Albondigas soup

      Nothing says comfort like a bowl of piping hot Albondigas soup. Tender meatballs are cooked in a tomato-based broth with fresh veggies and rice for a complete meal that can nourish your body as well as your soul!

      Ingredients and Substitutions:

      • Ground beef: I like using lean ground beef, but you can use a combination of pork and beef or even chicken or turkey ground meat.
      • Egg: egg is used as a binding agent between the ground beef and the breadcrumbs. if you don't eat egg, try adding a tablespoon or two of yogurt.
      • Breadcrumbs: also prevent the meatballs from falling apart. You can substitute them with crushed crackers or cornflakes, or even cooked rice.
      • Milk: you can use water instead to help bring all the meatball ingredients together.
      • Garlic: minced garlic elevates the meatballs' flavor, but you can omit it. It is also used to flavor the broth.
      • Dry oregano and fresh parsley also flavor the meatballs. Use whatever herbs you have on hand.
      • Roma tomatoes: or any other beefy tomatoes can be used as the broth base.
      • Onion: to flavor the broth, you can use white or yellow.
      • Olive oil: or your favorite oil to "fry" the tomato sauce base for the broth.
      • Beef broth or chicken broth can be used as the base.
      • Bay leaves: are optional. They help flavor the broth.
      • White rice: this makes your soup a complete meal. In the absence of rice, you can add diced potatoes.
      • Carrots and Zucchini or your favorite veggies can be used in this delicious soup.
      • Fresh cilantro for serving! optional but very recommended!

      How to Make Albondigas Soup

      1. In a large bowl, place the ground beef, egg, breadcrumbs, minced garlic, chopped parsley, oregano, salt, and pepper. Mix using your hand just until well combined. Don't overwork the meat or your meatballs will turn out tough

      2. Divide the meat mixture into approximately 22 meatballs. For easier shaping, wet your hands slightly so the mixture doesn't stick to them.

      3. Make the soup base by blending the tomatoes, onion, garlic, and ½ cup of the beef (or chicken) broth until smooth.

      4. Heat the olive oil in a large pot and add the tomato sauce. "Fry" for about 2 minutes, then add the rest of the beef or chicken broth. Season with salt and pepper and add two bay leaves (optional).

      5. Bring the broth to a boil and carefully add the meatballs one at a time. Reduce the heat and simmer for 10 minutes or until the meatballs are cooked.

      6. Add the rice and diced veggies and cook until the rice is cooked through, about 10-15 minutes.

      7. Add freshly chopped cilantro and serve while hot!

      • Serve your Albondigas Soup with sliced avocados, lime wedges, and fresh crema (sour cream) on top!

      Tips for the Best Albondigas Soup

      • When making the meat mixture, don't overwork it. Mix until just combined or the meatballs won't turn out as tender.
      • Cooking the sauce in a little oil prior to adding the broth helps develop much more flavor than just boiling it.
      • If you have leftover rice, use it. Add it in the final minutes of cooking to warm it up.
      • Try making the meatballs all roughly the same size.
      albondgias soup

      Albondias Soup (Sopa de Albondigas)

      Tender meatballs swimming in a rich-flavored tomato broth will nourish your body as well as your soul!
      Print Pin Rate
      Course: Soup
      Cuisine: Latin
      Keyword: albondigas, albondigas soup, latin cuisine, meatball soup, one-pot meal, soup
      Prep Time: 20 minutes minutes
      Cook Time: 25 minutes minutes
      Total Time: 45 minutes minutes
      Servings: 4
      Calories: 396kcal

      Equipment

      • 1 large pot
      • large bowl
      • cutting board
      • sharp knife

      Ingredients

      • 1 lb lean ground beef
      • 1 egg
      • ⅓ cup breadcrumbs
      • ¼ cup milk
      • 1 teaspoon oregano
      • 1 clove garlic minced
      • 1 tsp salt or to taste
      • freshly ground black pepper to taste
      • 3 tablespoon fresh parsley chopped
      • 2 large carrots thickly sliced
      • 1 large zucchini thickly sliced
      • ½ cup white rice uncooked
      • ¼ cup cilantro freshly chopped
      • sliced avocados, lime wedges for serving

      For the broth:

      • 1 lb Roma tomatoes (about 4) seeds removed
      • ¼ white onion
      • 1 clove garlic
      • 4 cups Beef or chicken broth
      • 1 teaspoon salt or to taste
      • freshly ground black pepper to Tate
      • 2 teaspoon olive oil

      Instructions

      • In a large bowl, place the ground beef, egg, breadcrumbs, minced garlic, chopped parsley, oregano, salt, and pepper. Mix using your hand just until well combined. Don't overwork the meat or your meatballs will turn out tough
      • Divide the meat mixture into approximately 22 meatballs (about 2tbsp each). For easier shaping, wet your hands slightly so the mixture doesn't stick to them.
      • Make the soup base by blending the tomatoes, onion, garlic, and ½ cup of the beef (or chicken) broth until smooth
      • Heat the olive oil in a large pot and add the tomato sauce. "Fry" for about 2 minutes, then add the rest of the beef or chicken broth. Season with salt and pepper and add two bay leaves.
      • Bring the broth to a boil and carefully add the meatballs one at a time. Reduce the heat and simmer for 10 minutes or until the meatballs are cooked
      • Add the rice and diced veggies and cook until the rice is cooked through, about 10-15 minutes
      • Add freshly chopped cilantro and serve while hot!

      Nutrition

      Calories: 396kcal | Carbohydrates: 34.5g | Protein: 32g | Fat: 15g | Saturated Fat: 6g | Polyunsaturated Fat: 0.5g | Monounsaturated Fat: 1.7g | Trans Fat: 0.5g | Cholesterol: 72mg | Sodium: 3548mg | Potassium: 728mg | Fiber: 3g | Sugar: 7.5g

      Lomo Saltado (Peruvian Beef Stir Fry)

      May 25, 2025 · 2 Comments

      Lomo Saltado

      Lomo Saltado is a quick 30-minute Peruvian-style beef stir fry made with tomatoes, red onion, and bell peppers. The tomatoes cook down along with soy sauce and red wine vinegar to create a tangy and slightly sweet glaze while the beef remains tender and juicy.

      Jump to Recipe

      Ingredients and Substitutions for Lomo Saltado

      • Beef tenderloin: is the best choice for a tender steak, but by all means use whatever beef steak you have on hand.
      • Roma tomatoes: for this recipe, tomatoes are cut into wedges, so use Roma or beef tomatoes if possible. You can use halved grape tomatoes in a pinch.
      • Bell pepper: I used green and yellow for color, but use red or any color bell peppers you have on hand.
      • Red onion is a must. Of course you can use white or yellow onion, but for authenticity, red onion is the way to go.
      • Soy sauce: for a healthier meal, use low-sodium if you can or gluten-free if you must. Coconut aminos can also be used as a gluten-free option.
      • Red wine vinegar is the most authentic flavor-wise, but you can use apple cider vinegar as a substitute.
      • Fresh Cilantro: there is no substitution for fresh cilantro. If you don’t have any, you can still make the dish, but the flavor will be slightly different.
      • Avocado oil: I like using avocado oil for its healthier properties, but you can use olive or your favorite oil.

      How to Make Peruvian Beef Stir Fry

      1. Prep your veggies: cut the tomatoes and onions into wedges and julienne the bell peppers. Roughly chop the cilantro and set aside. 
      1. Heat a large skillet over high heat and add ½ tablespoon oil. Once the oil is hot, add the beef strips. Season with salt and pepper. Make sure you don’t overcrowd the pan. Don’t touch the strips for about 2 minutes, flip and cook on the other side until brown as well. Transfer to a plate. Continue until all the strips are brown. They don’t have to be fully cooked.
      1. Add ½ tablespoon of oil to the same skillet, reduce the heat to medium-high, and saute the onions and bell peppers until soft, about 2 minutes. Pour in the soy sauce, water, red wine vinegar, and add the tomato wedges and chopped cilantro. Reduce the heat to medium-low and cook until the tomatoes are soft, about 5 minutes.
      1. Return the beef strips to the skillet, season with salt and pepper, and cook for about 2 minutes until the beef is cooked through. Serve over freshly cooked white rice or alongside French fries.

      • Serve Lomo Saltado over freshly cooked rice or French fries!

      TIPS to Make the Best Peruvian Lomo Saltado:

      • Make sure the skillet and oil are very hot before adding the beef strips. If the skillet and oil are not hot enough, the beef will just cook without browning and developing its best flavor. 
      • Season the beef with salt and pepper before browning, then check the seasoning at the very end and add more salt if needed. Remember that soy sauce is fairly salted.
      • Overcrowding the skillet won’t let the beef strips brown properly. Make sure you brown them in batches if your skillet is not large enough to hold them all in one layer.
      • Don’t cut the onions in thin strips, this dish is made with thick onion wedges.
      • For tender stir fry beef, you need it to be a bit pink in the middle. Don’t overcook it.
      • You can always add more soy sauce or vinegar until the sauce reaches your desired flavor!

      Lomo Saltado (Peruvian Beef Stir Fry)

      Lomo Saltado is a Peruvian staple. Veggies cook alongside soy sauce and red wine vinegar to make a tangy and slightly sweet glaze, while beef tenderloin strips turn out tender and juicy.
      5 from 1 vote
      Print Pin Rate
      Course: Main Course
      Cuisine: Latin
      Keyword: 30-minute meal, Beef, one-pan meal, Peruvian Lomo Saltado, Stir fried beef
      Prep Time: 15 minutes minutes
      Cook Time: 15 minutes minutes
      Total Time: 30 minutes minutes
      Servings: 4 servings
      Calories: 430kcal

      Equipment

      • 1 large skillet
      • 1 cutting board
      • 1 sharp knife
      • measuring spoons

      Ingredients

      • 1 tablespoon avocado or olive oil
      • 1 lb beef tenderloin cut into ½-thick strips
      • ½ teaspoon salt or to taste
      • freshly ground black pepper to taste
      • ½ large red onion cut into wedges
      • ½ large green bell pepper julienned (not too thin)
      • ½ large yellow bell pepper julienned (not too thin)
      • 3 Roma tomatoes cut into wedges
      • 3 tablespoon fresh cilantro roughly chopped
      • 3 tbsp low-sodium soy sauce
      • 2 tbsp red wine vinegar
      • ¼ cup water

      Instructions

      • Prep your veggies: cut the tomatoes and onions into wedges and julienne the bell peppers. Roughly chop the cilantro and set aside
      • Heat a large skillet over high heat and add ½ tablespoon oil. Once the oil is hot, add the beef strips. Season with salt and pepper. Make sure you don’t overcrowd the pan. Don’t touch the strips for about 2 minutes, flip and cook on the other side until brown as well. Transfer to a plate. Continue until all the strips are brown. They don’t have to be fully cooked
      • Add ½ tablespoon of oil to the same skillet, reduce the heat to medium-high, and saute the onions and bell peppers until soft, about 2 minutes. Pour in the soy sauce, water, red wine vinegar, and add the tomato wedges and chopped cilantro. Reduce the heat to medium-low and cook until the tomatoes are soft, about 5 minutes
      • Return the beef strips to the skillet, season with salt and pepper, and cook for about 2 minutes until the beef is cooked through. Serve over freshly cooked white rice or alongside French fries

      Notes

      • To reduce the amount of calories, you can use cooking spray instead of oil
      • This recipe keeps in the fridge for up to 4 days when stored in an airtight container 
      • It can be frozen for up to 3 months in an airtight container 

      Nutrition

      Calories: 430kcal | Carbohydrates: 6g | Protein: 28.5g | Fat: 32g | Saturated Fat: 11g | Polyunsaturated Fat: 2g | Monounsaturated Fat: 4g | Cholesterol: 96mg | Sodium: 700mg | Potassium: 378mg | Fiber: 1g | Sugar: 2g | Vitamin A: 11IU | Vitamin C: 102mg | Calcium: 1.5mg | Iron: 25mg

      Primary Sidebar

      © 2025 The Latin Pantry. All rights reserved.